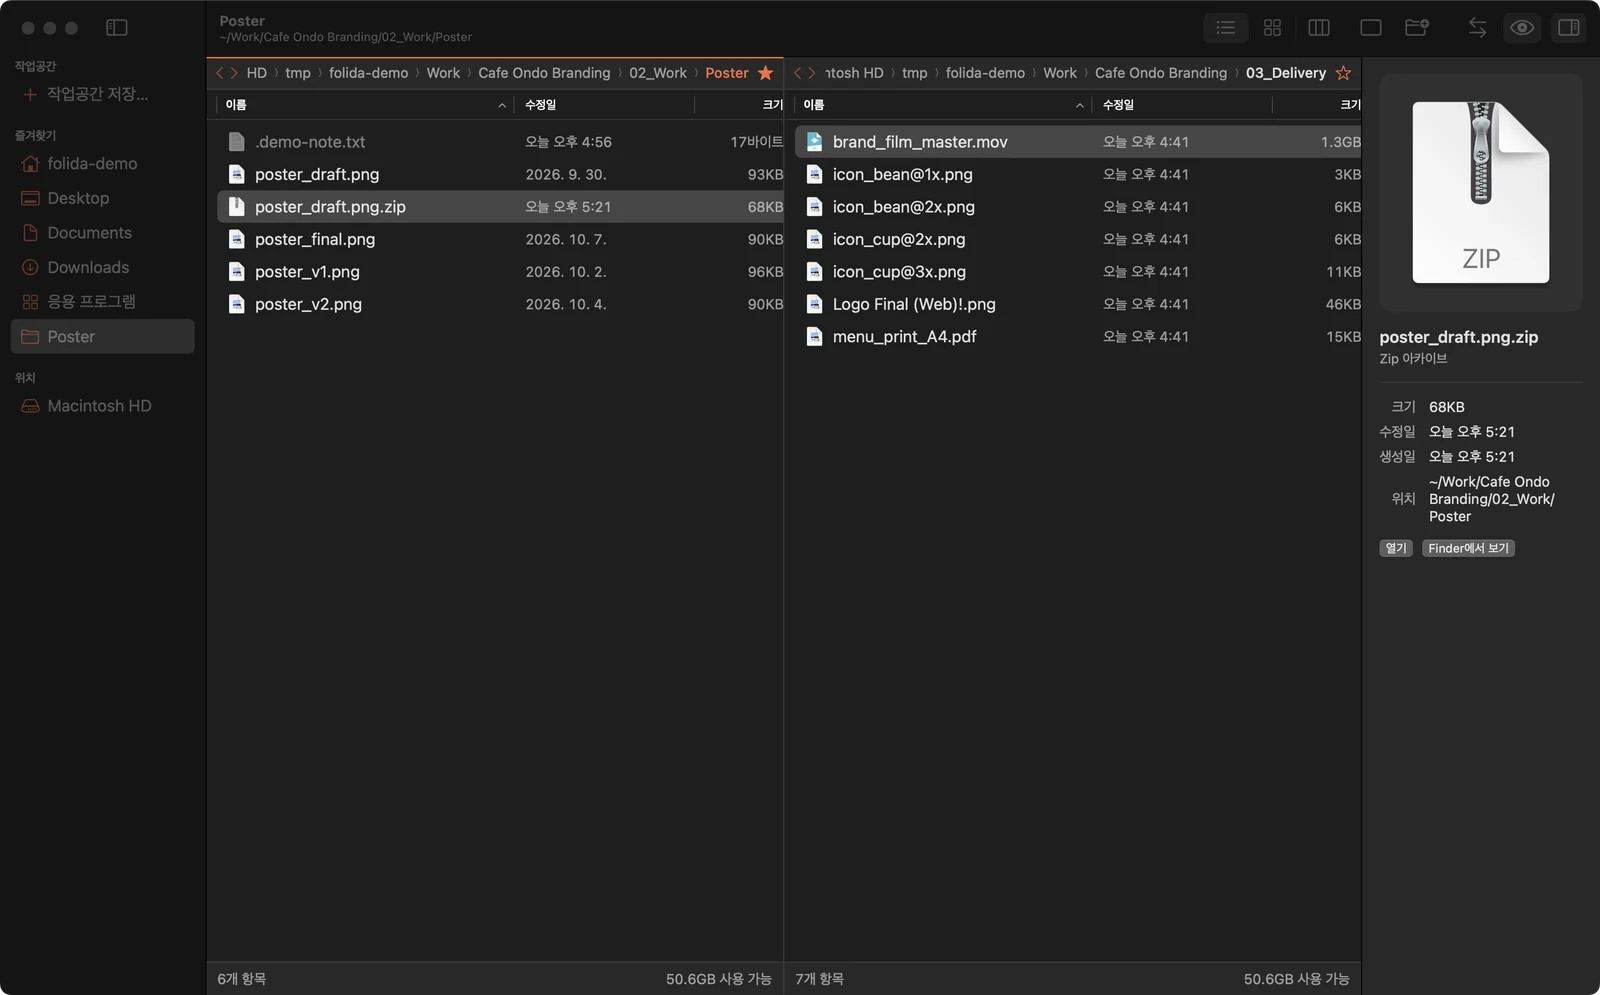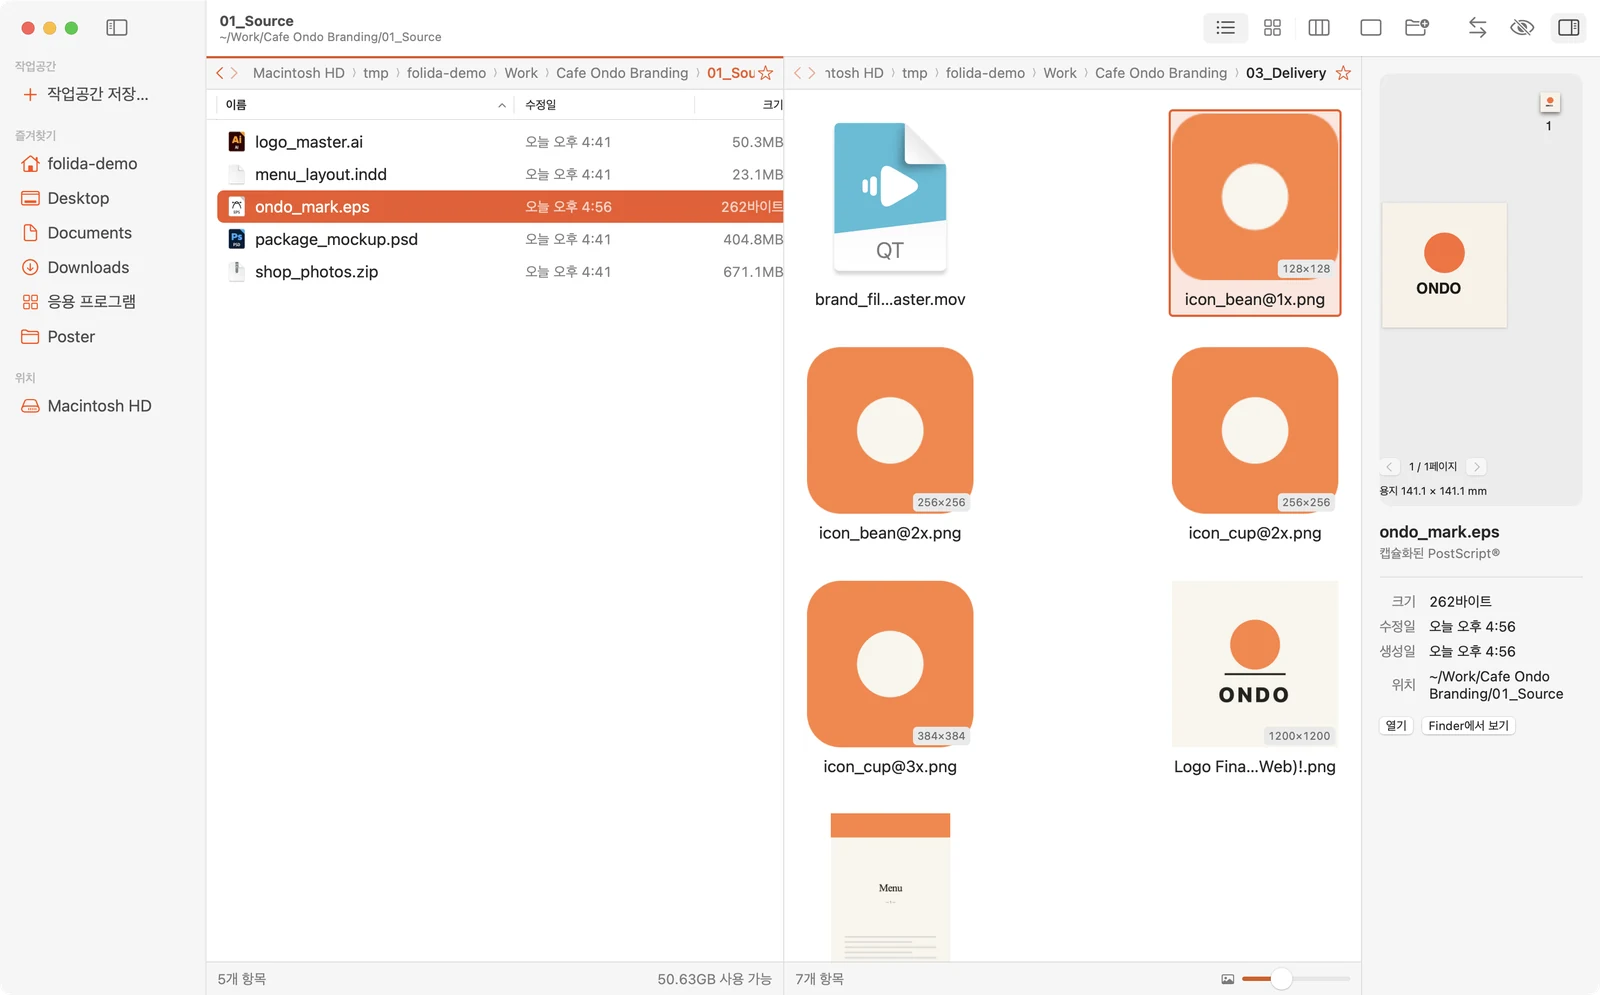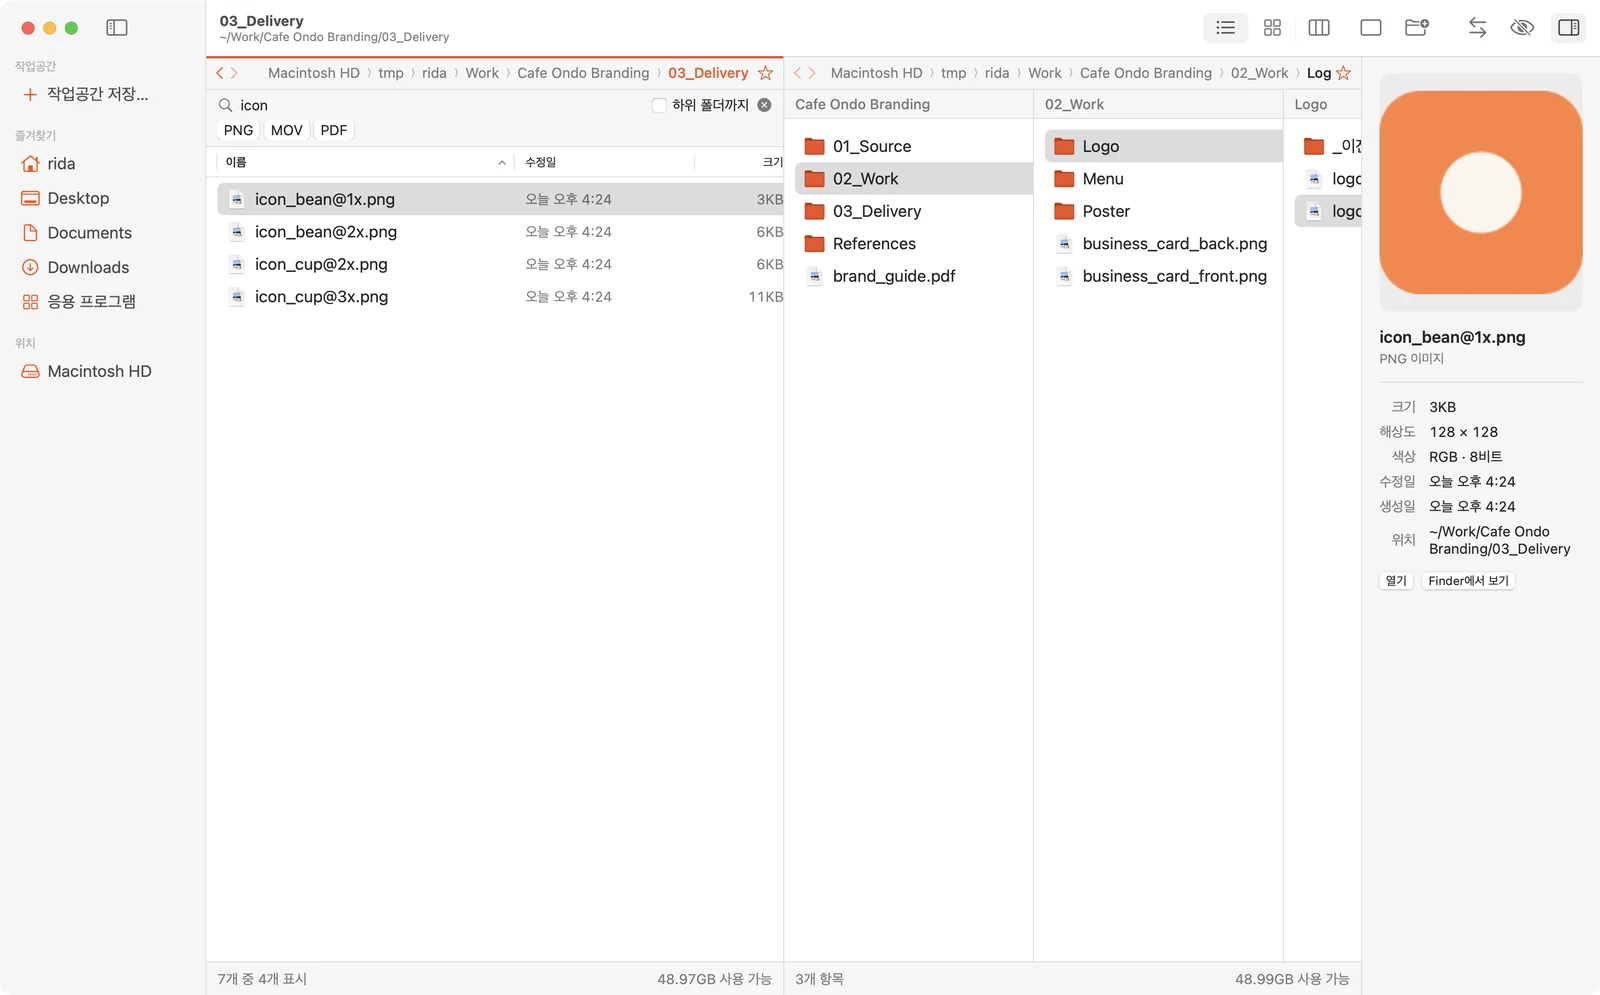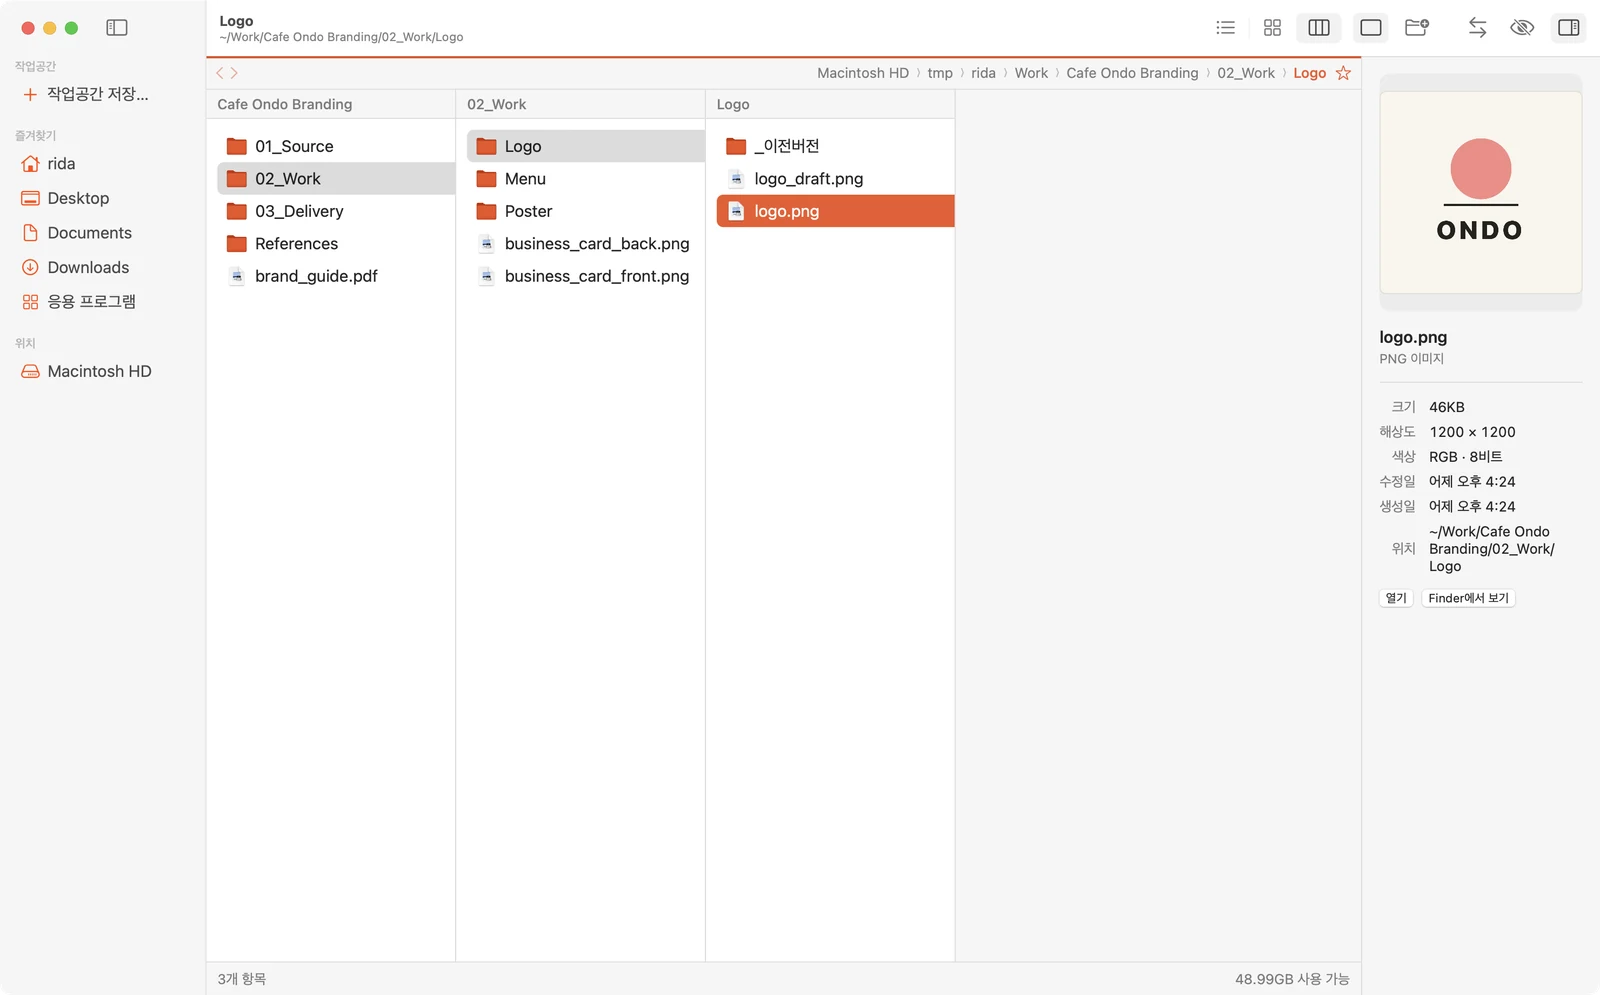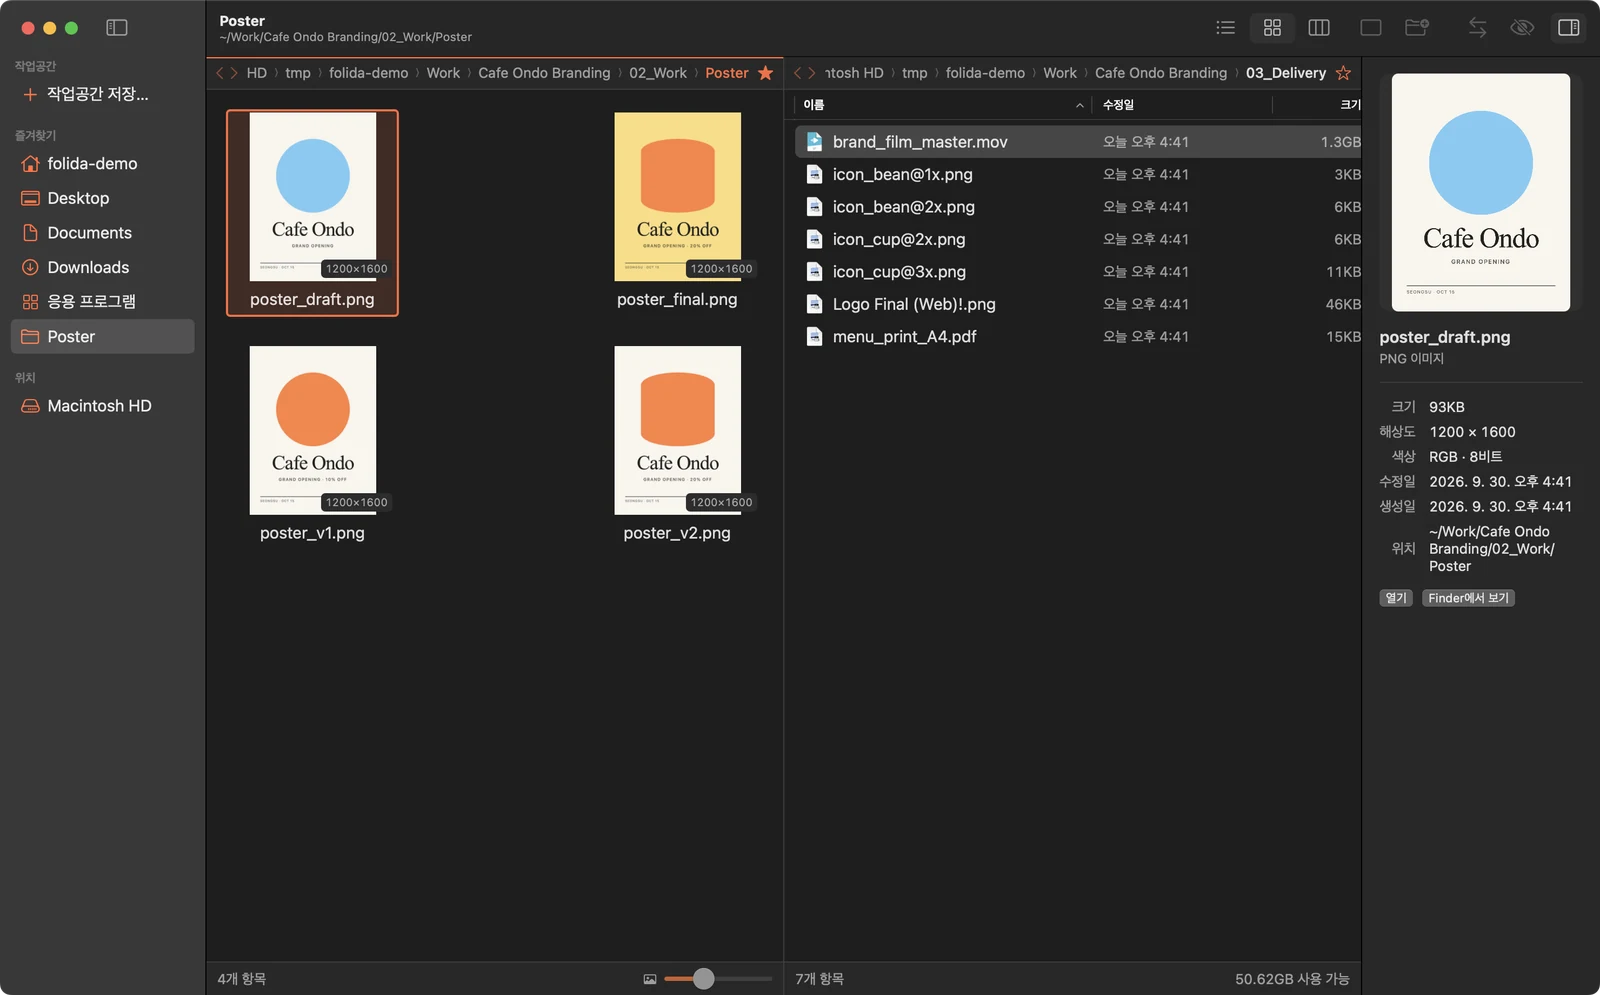
작업 중인 폴더를 편하게 정리하고 싶어서 만든 맥용 파일관리자입니다. 두 폴더를 나란히 열어 둔 채로 시안을 비교하고, 쌓인 버전 파일을 정리하고, 최종 파일을 전달하기 전에 이름을 한 번에 바꾸거나 빠진 파일이 없는지 확인할 수 있습니다. MCP를 연결하면 AI에게 폴더 정리를 맡길 수도 있습니다. 기획부터 디자인, SwiftUI · AppKit 개발까지 진행했습니다.A Mac file manager made for tidying design project folders. Two folders open side by side, so you can compare drafts, clear out piled-up versions and check files before delivery. You can also hand folder cleanup to an AI and approve the result. I handled planning, design and SwiftUI / AppKit development.
macOS · 2026
파일을 정리하며 매번 반복되던 일을 한 창 안에서 끝낼 수 있도록 기능을 골랐습니다. 디자이너뿐 아니라 파일 정리가 필요한 누구나 쓸 수 있습니다.Finder shows one folder per window, so moving and comparing means juggling windows. The features cover the chores that repeat in every design job.
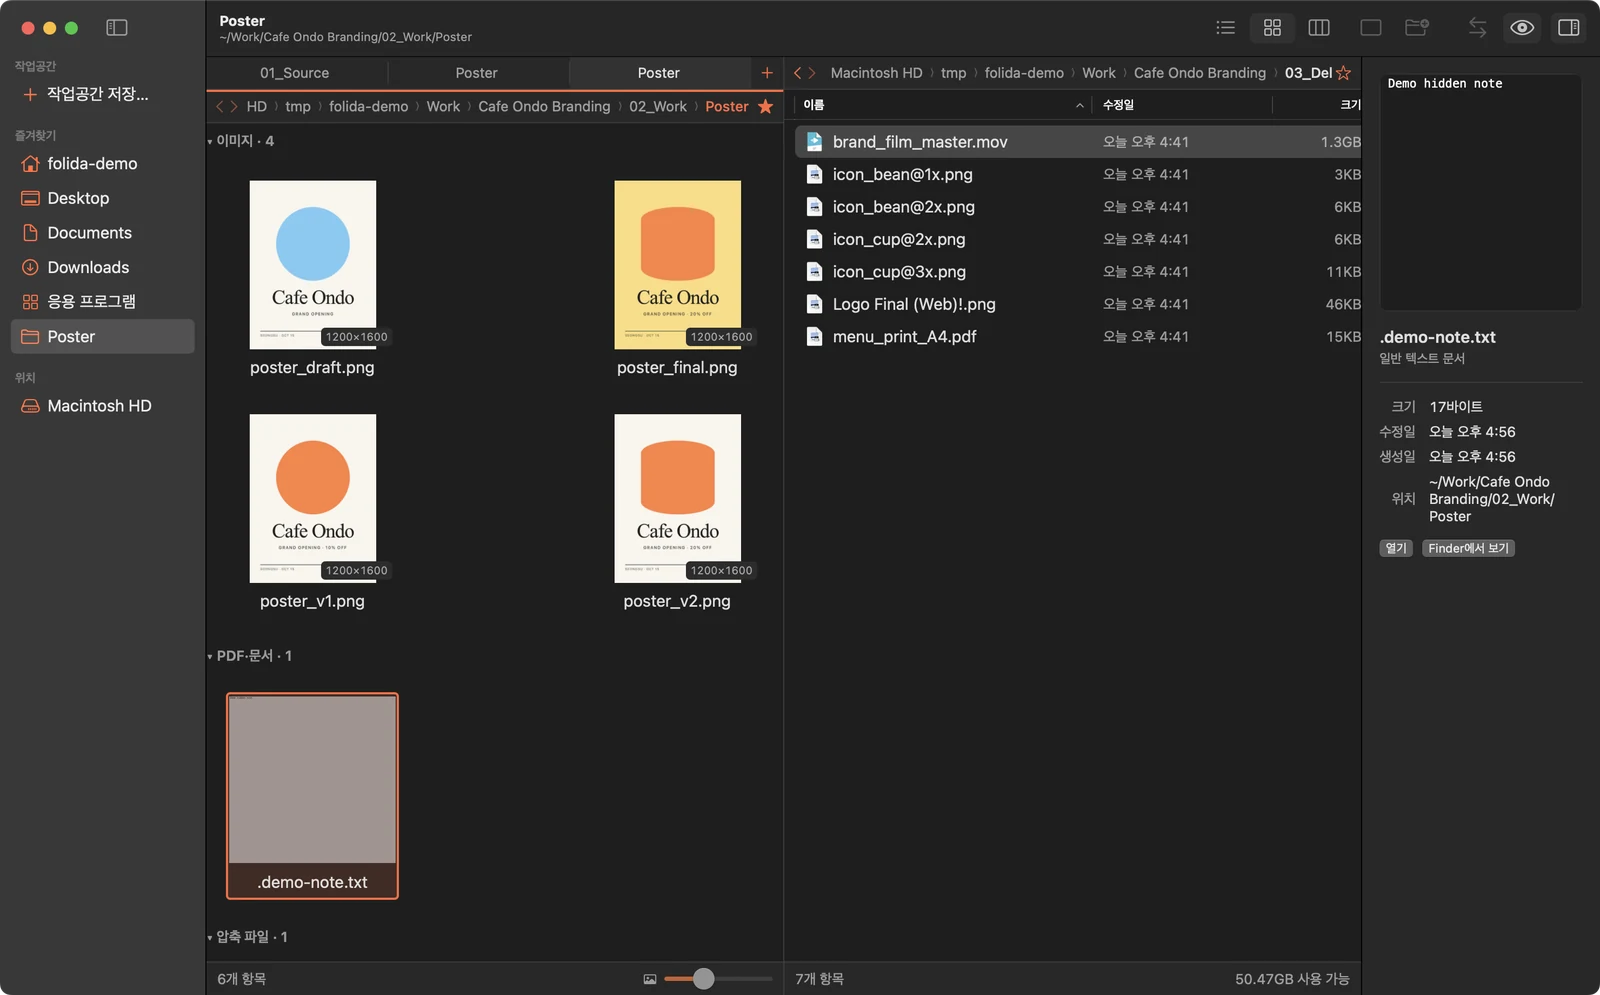
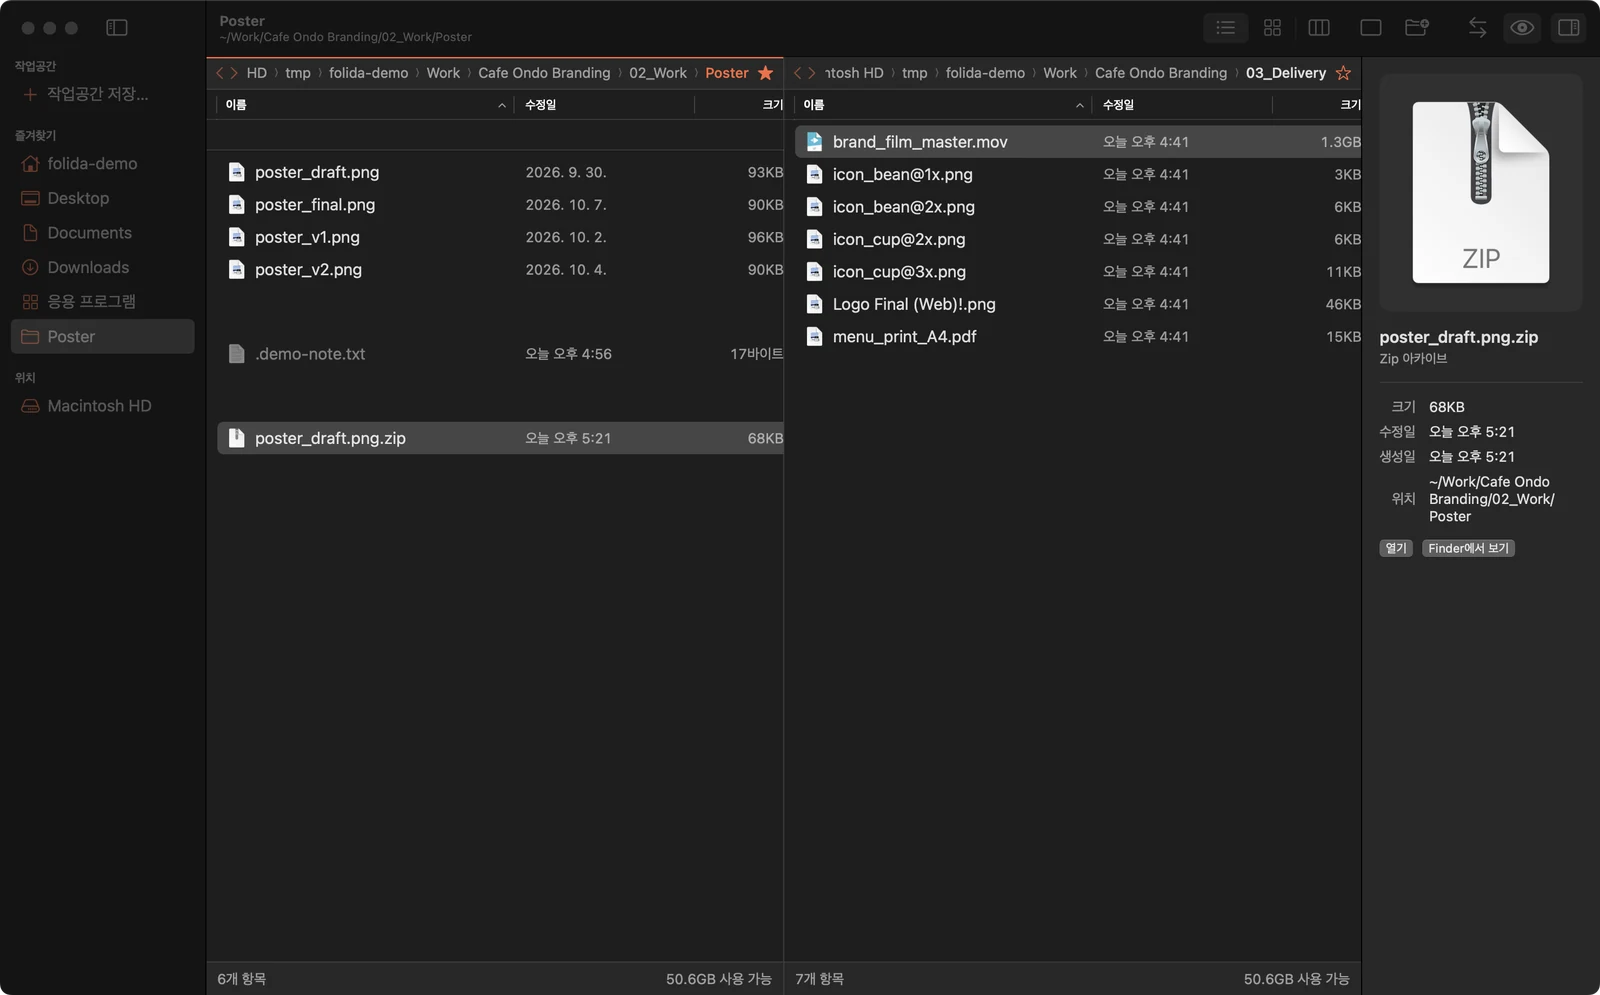
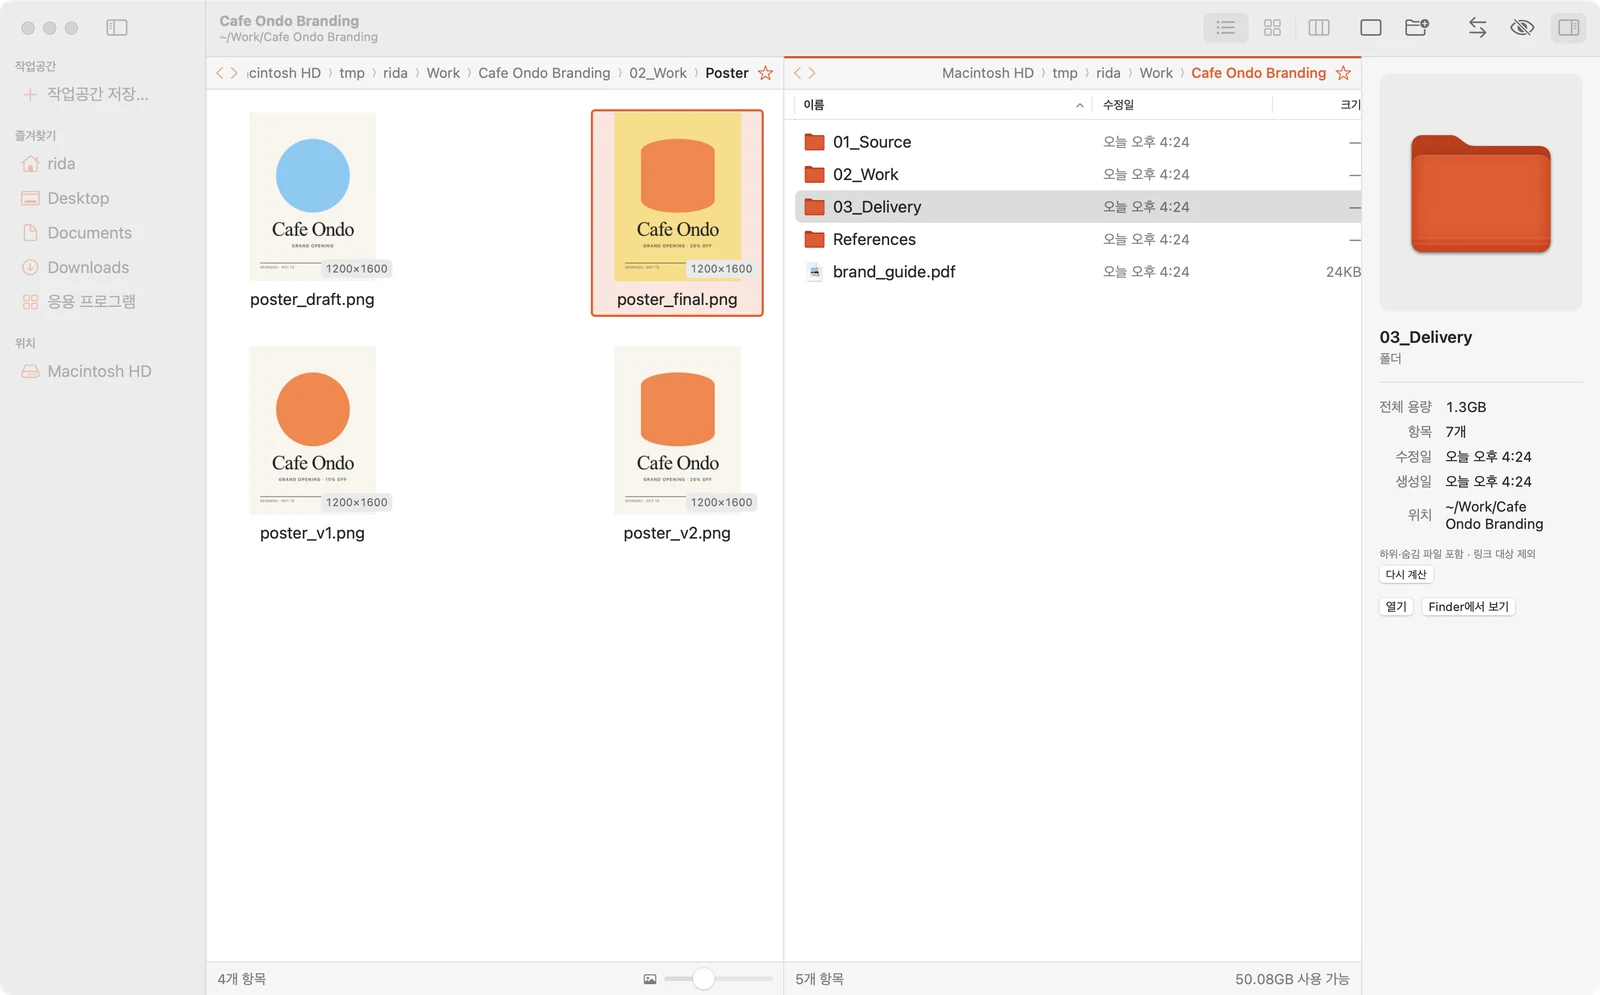
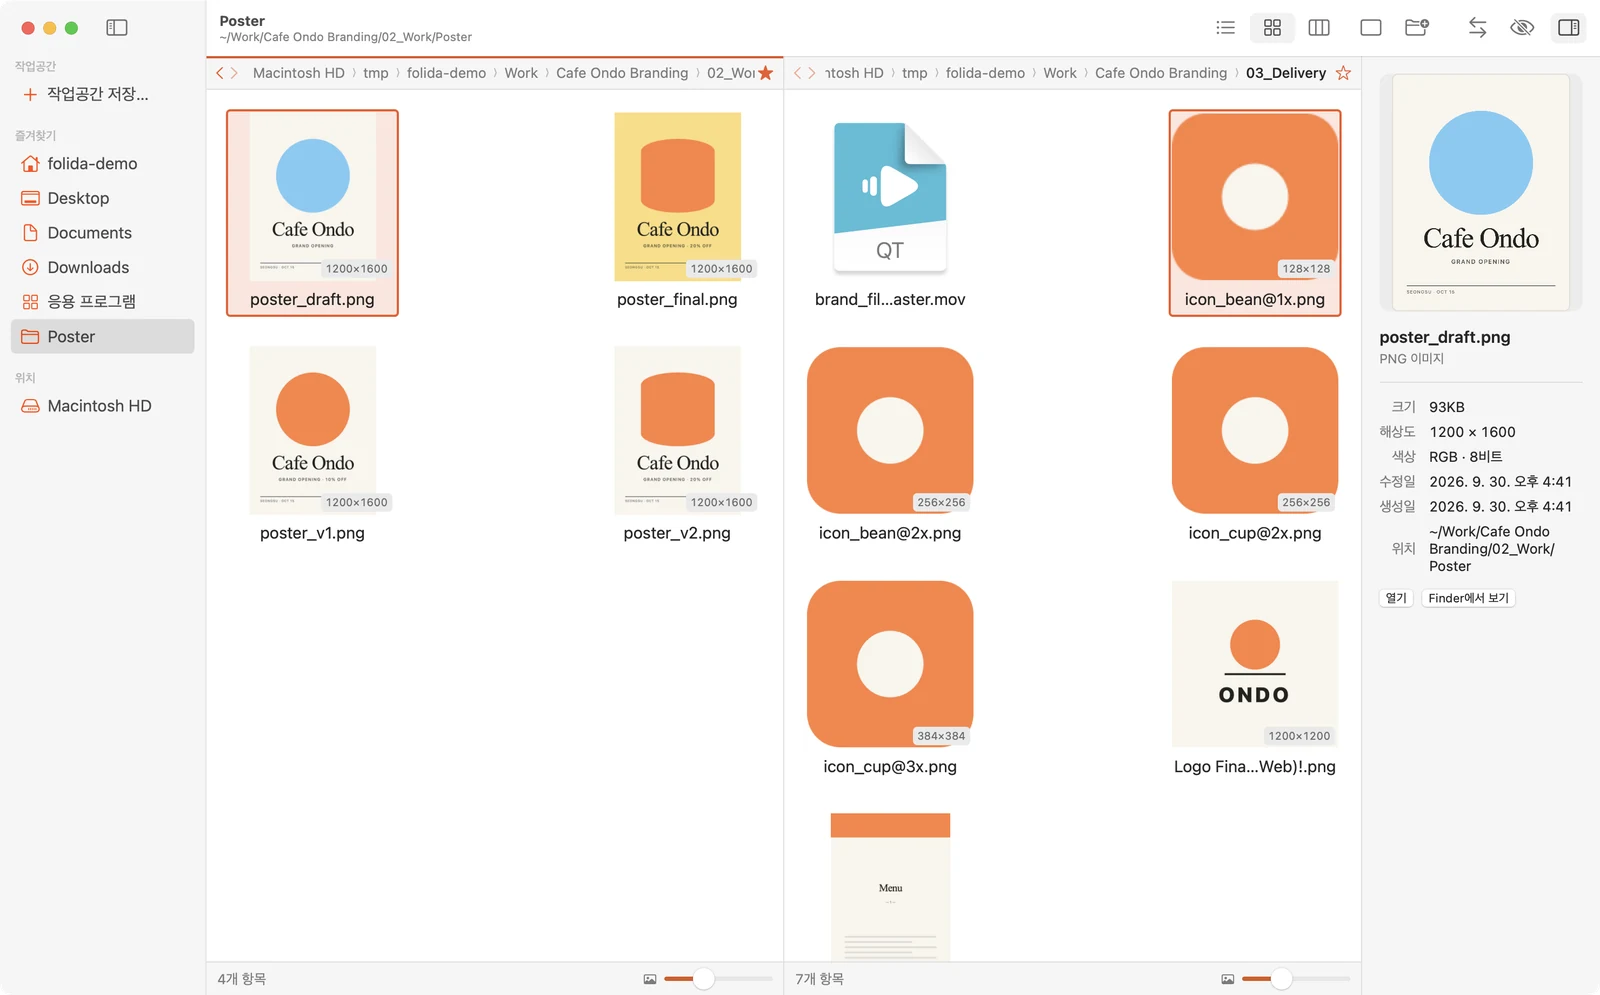
왼쪽과 오른쪽 패널이 각자 보기 방식을 기억하도록 했습니다. 사진 폴더는 큰 썸네일로, 납품 폴더는 목록으로 열어 둘 수 있고, 글자와 줄 크기도 큰 모니터에 맞게 세 단계로 조절할 수 있습니다.Each pane remembers its own view: photos as large thumbnails, the delivery folder as a list. Text and row size come in three steps for large monitors.

PSD · AI · PDF · HEIC · 영상까지 썸네일로 확인할 수 있습니다. 그림은 비율을 유지한 채 칸에 맞춰 보여주고, 아래에 해상도 배지(1200×1600 등)를 함께 표시합니다.PSD, AI, PDF, HEIC and video use macOS thumbnails. Images keep their ratio and carry a resolution badge (1200×1600 and so on).
화면에 보이는 칸부터 썸네일을 만들고 지나간 칸은 건너뛰어, 파일이 많은 폴더에서도 느려지지 않도록 했습니다.Thumbnails are made for visible cells first and cancelled once scrolled past, so big folders stay quick.

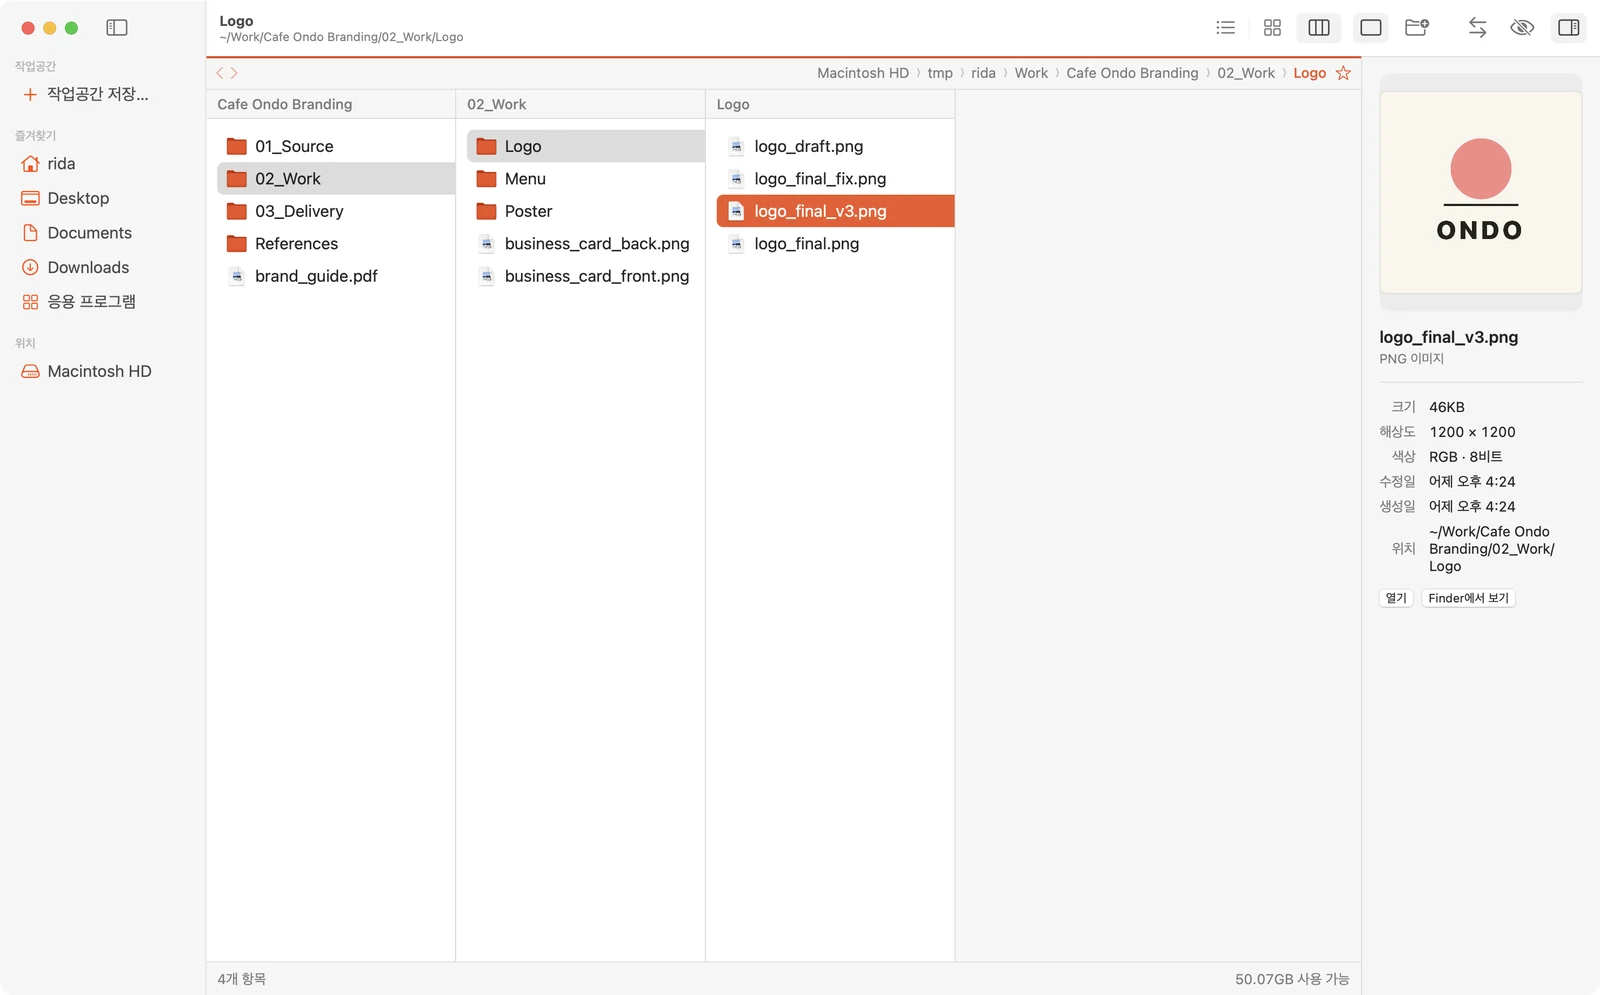
폴더를 한 번 누르면 오른쪽에 다음 열이 펼쳐져, 깊은 폴더로 내려가면서도 위쪽 단계를 계속 확인할 수 있습니다.Click a folder once and the next column opens to its right; upper levels stay in view as you go deeper.

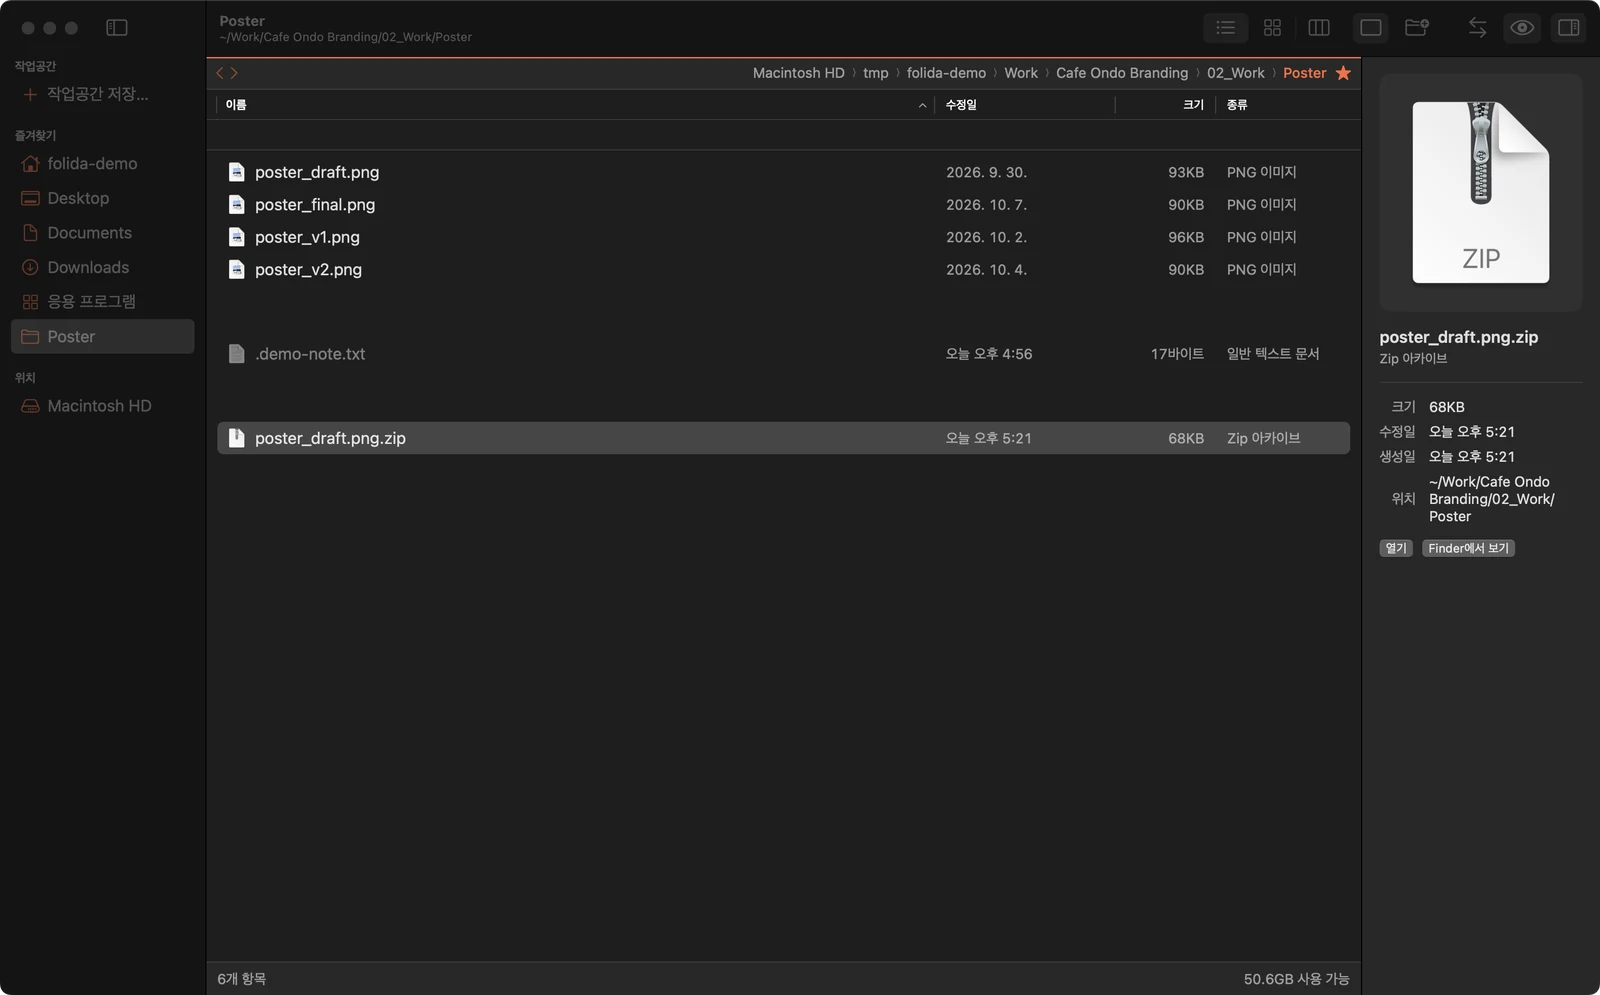
툴바 버튼으로 지금 패널을 화면 가득 넓혀 종류 열까지 함께 볼 수 있습니다. 한 번 더 누르면 두 패널로 돌아갑니다.A toolbar button gives the active pane the full width, with a kind column for scanning. Press again for two panes.
⌘U로 좌우 패널을 바꾸고, ⌘=로 반대 패널에 같은 폴더를 열 수 있습니다.⌘U swaps the panes; ⌘= opens the same folder on the other side.

보기 메뉴에서 켜면 이미지 · PDF · 압축 파일처럼 종류별로 나눠 볼 수 있어, 여러 파일이 섞인 폴더를 정리할 때 도움이 됩니다.From the View menu, files split into images, PDFs, archives and so on — handy for a mixed downloads folder.

점으로 시작하는 숨김 파일을 흐리게 함께 표시할 수 있습니다. 툴바의 눈 아이콘으로도 켜고 끌 수 있습니다.Dot-files appear dimmed in the list; the eye button in the toolbar toggles them too.
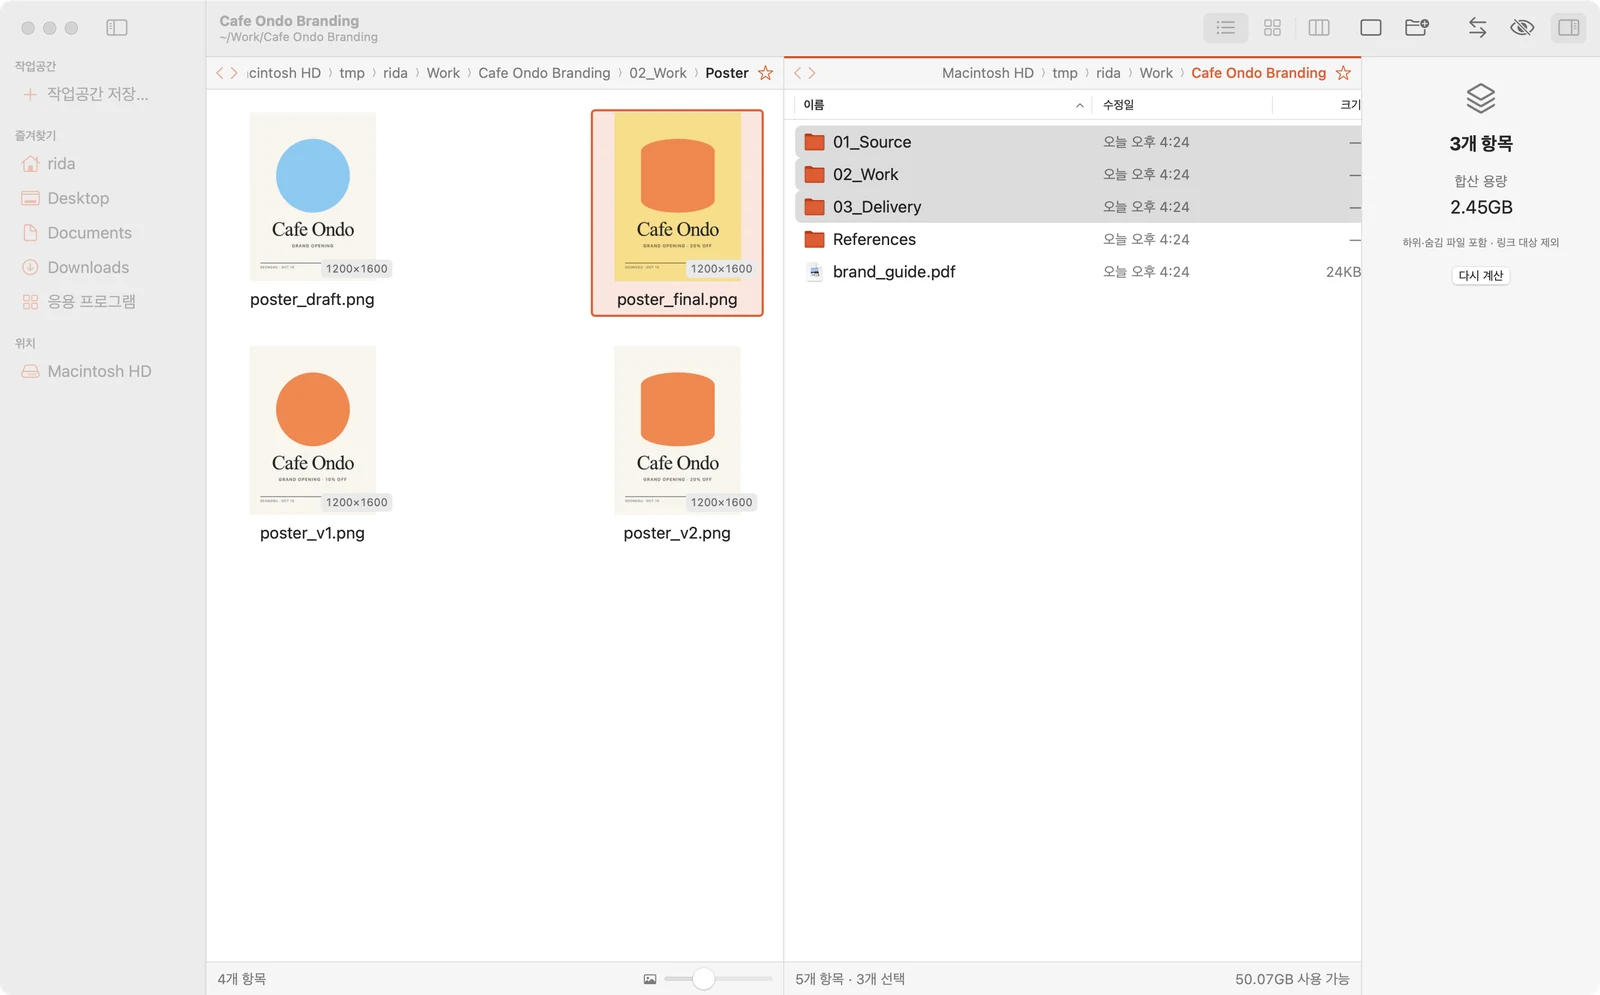
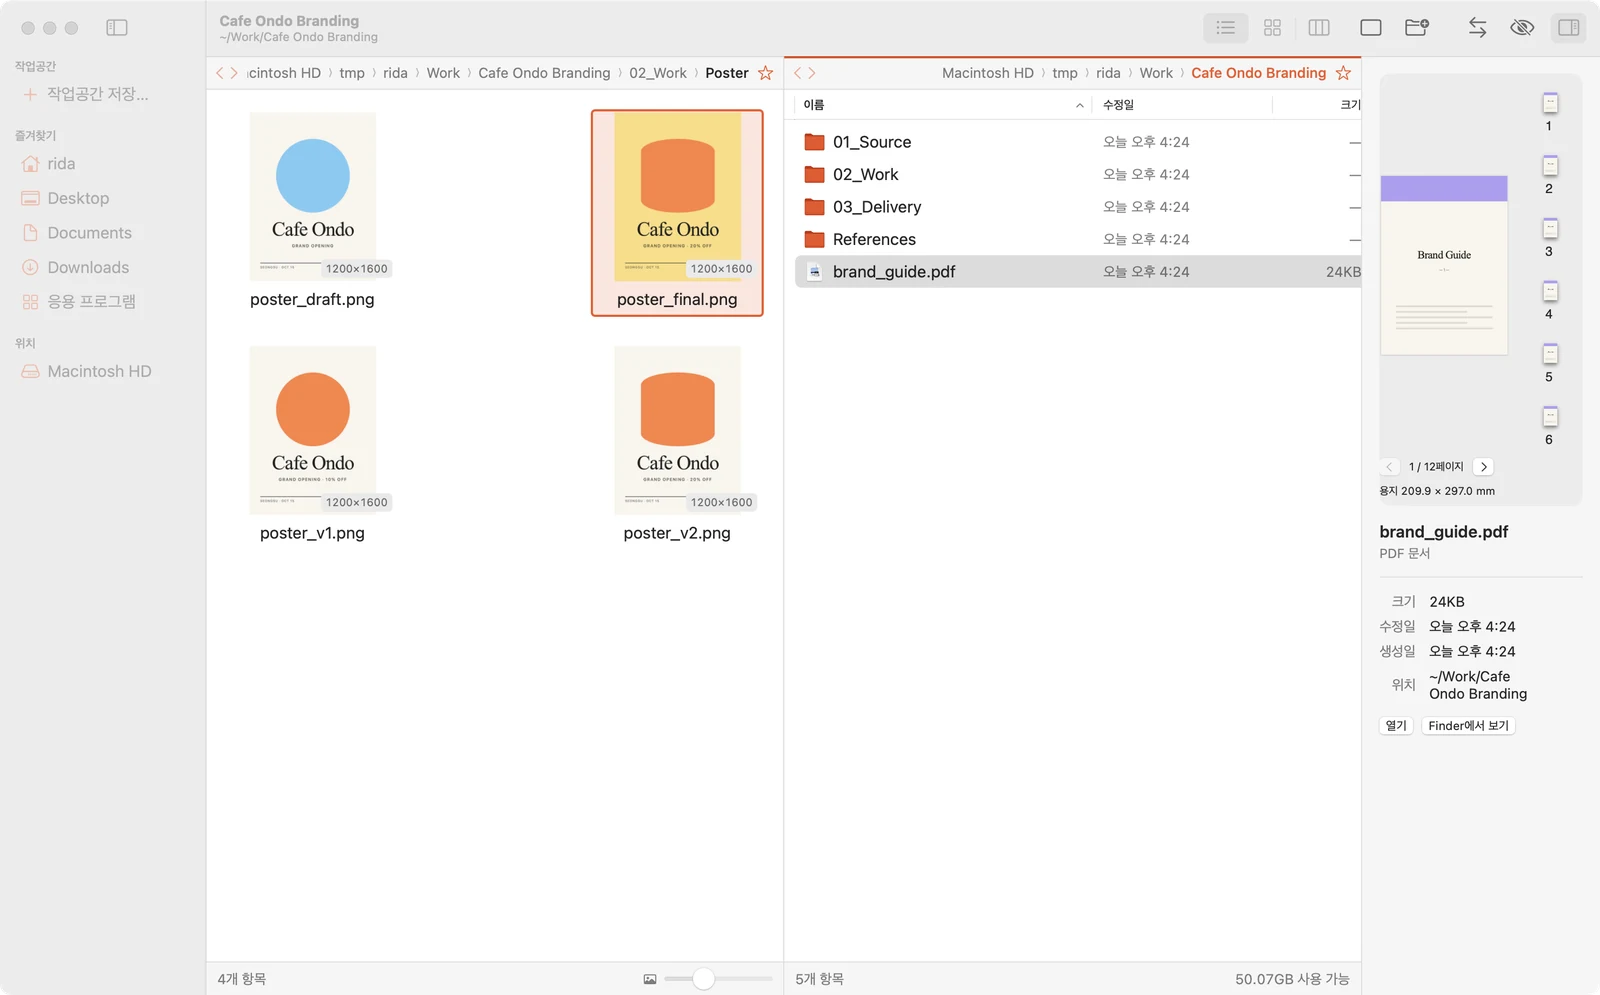
오른쪽 미리보기 패널(⌥⌘I)에서 파일을 열지 않고도 크기 · 해상도 · 색상 · 수정일 · 위치를 확인할 수 있습니다. 폴더를 선택하면 안에 든 파일까지 더한 전체 용량을 보여줍니다.The inspector (⌥⌘I) shows size, resolution, colour, dates and location. Pick a folder and it totals everything inside.


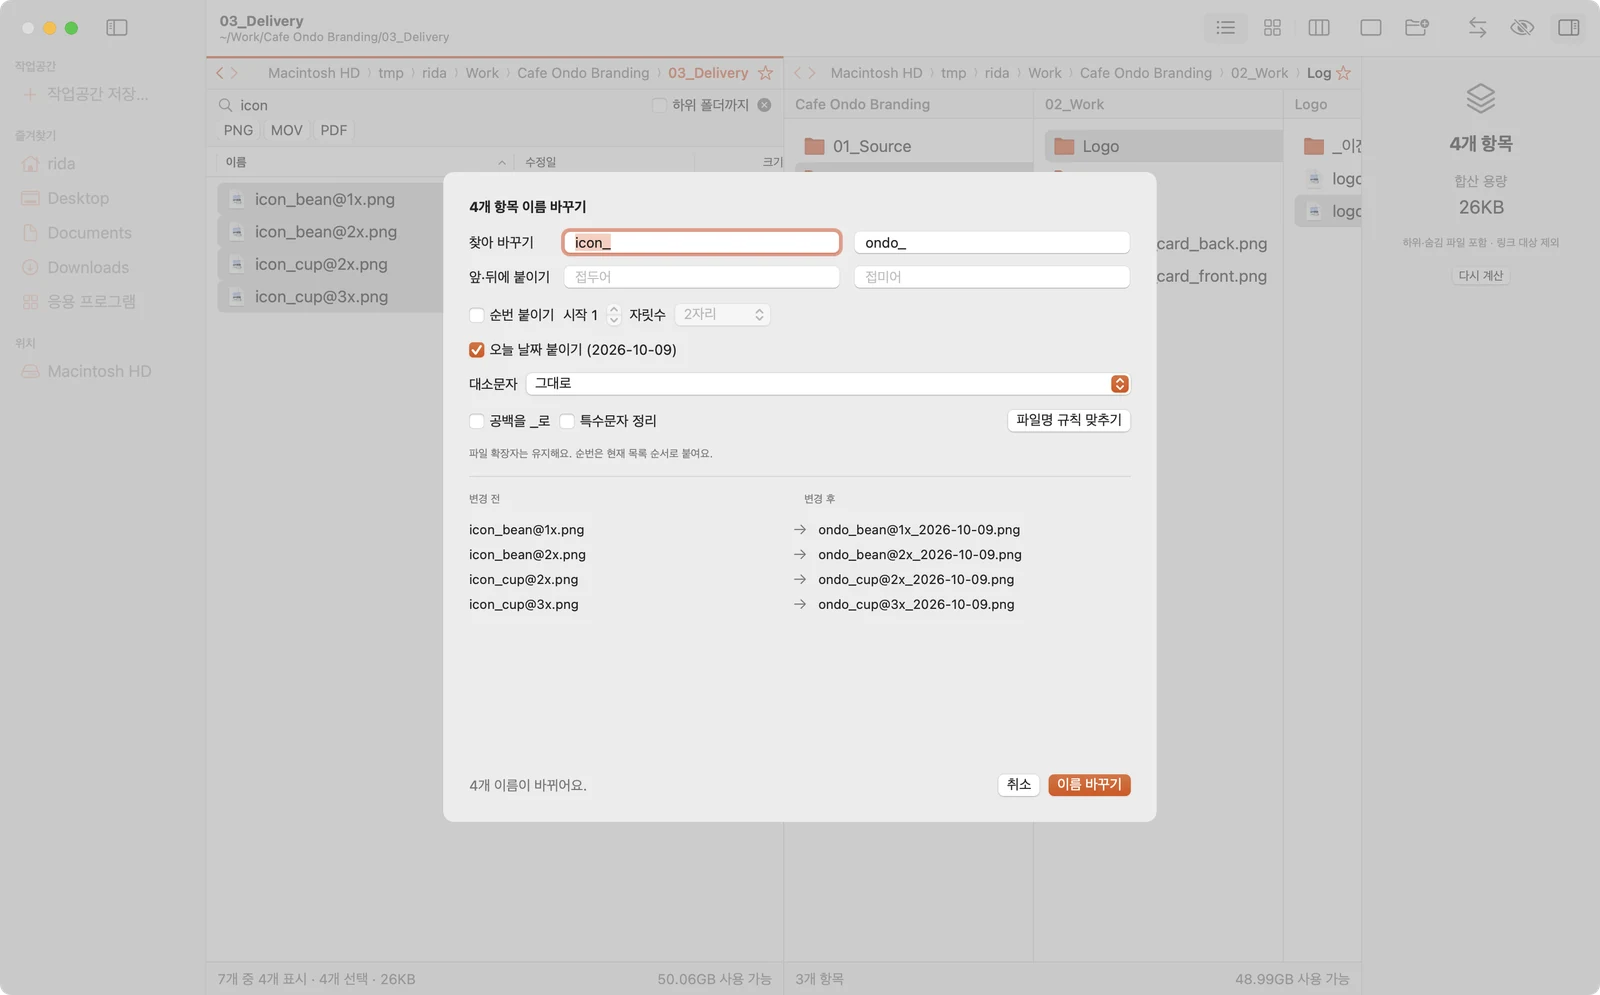
⌘F로 지금 폴더를 이름과 확장자로 걸러내고, 걸러진 파일을 F2로 한 번에 이름 바꿀 수 있습니다. 바꾸기 전에 바뀔 이름을 모두 미리 볼 수 있습니다.Filter the folder by name and type with ⌘F, select what's left and rename it all with F2, previewing every new name first. Try it below.


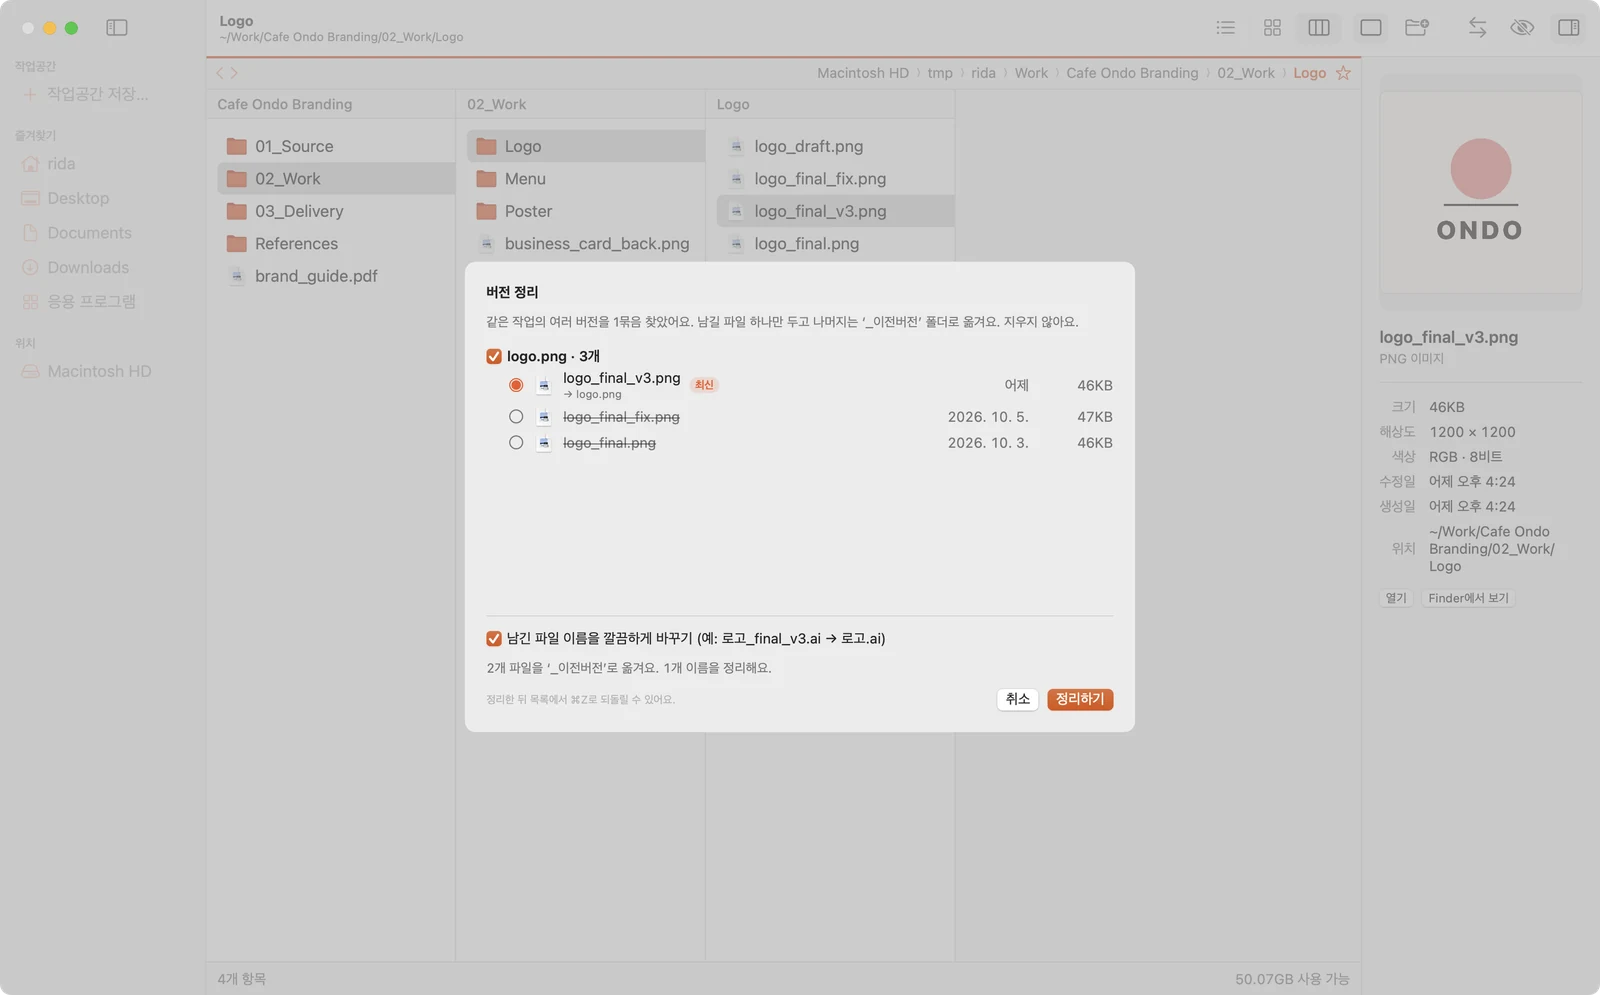
‘최종’, ‘final’, ‘fix’, ‘v3’, 날짜, ‘복사본’처럼 꼬리말만 다른 파일을 한 묶음으로 찾아줍니다. 묶음마다 남길 파일 하나(기본은 가장 최근 파일)를 고르면 나머지는 같은 폴더의 _이전버전으로 옮겨집니다. 파일은 지워지지 않고 휴지통으로도 가지 않습니다.Same-type files that differ only by suffixes — final, fix, v3, dates, copy — are grouped. One file per group stays (the newest by default); the rest move into _이전버전 in the same folder. Nothing even goes to the Trash.
final · final_fix · final_v3가 같은 작업으로 묶이고, 가장 최근 파일인 v3가 남습니다. draft는 이름 규칙이 달라 그대로 유지됩니다.final, final_fix and final_v3 form one group and v3, the newest, stays. draft follows a different pattern and is left alone.
앱에서는 묶음마다 남길 파일을 바꾸거나, 특정 묶음을 빼고 정리할 수도 있습니다.In the app you can pick a different file to keep, or leave a whole group out.


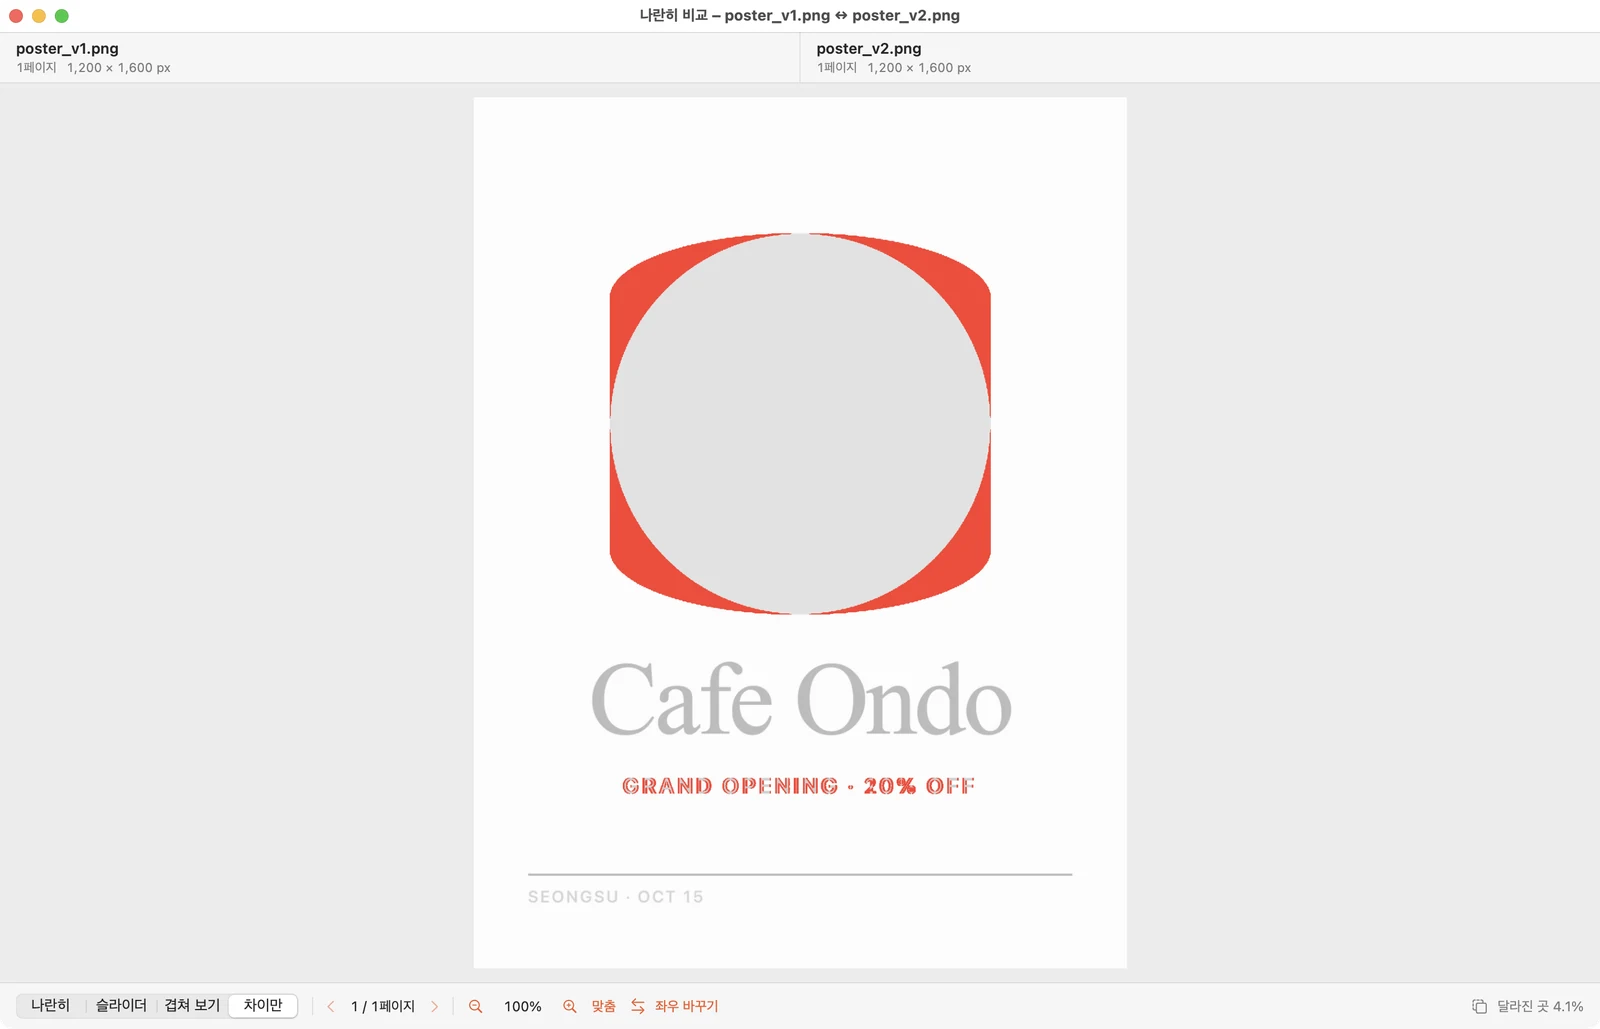
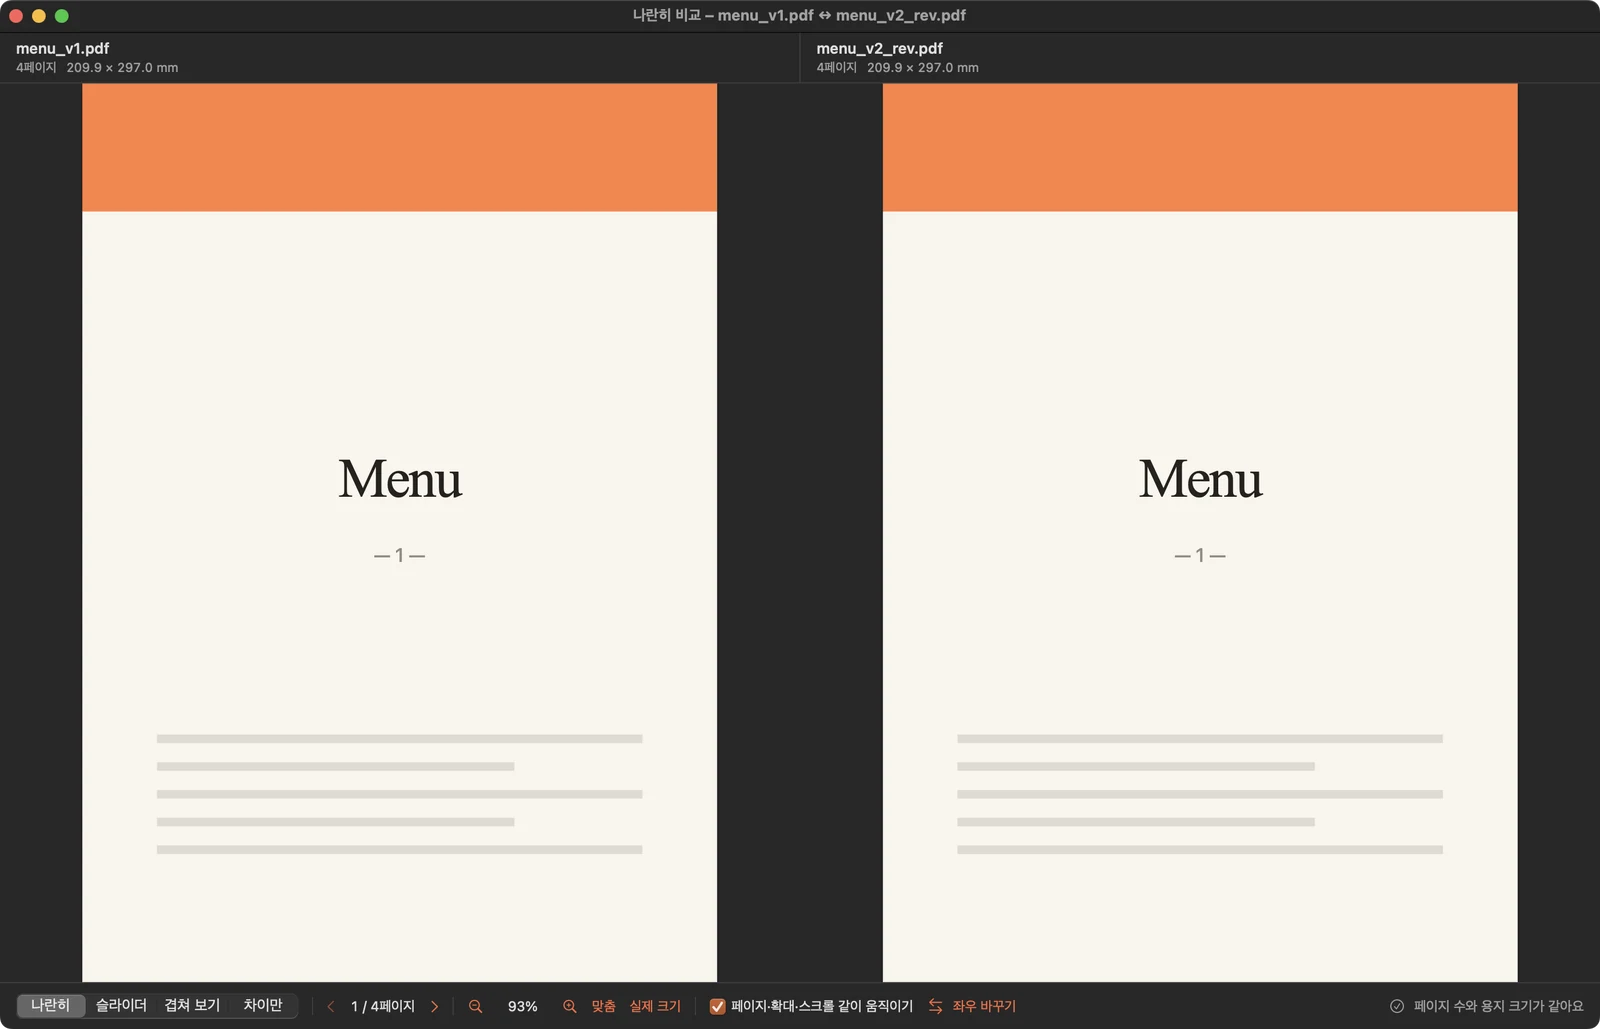
두 이미지나 PDF를 선택하고 ‘나란히 비교’를 누르면 비교 창이 열립니다. 한쪽을 확대하거나 스크롤하면 다른 쪽도 같은 위치로 함께 움직여, 같은 부분을 나란히 놓고 비교할 수 있습니다. 아래에서 앱과 같은 네 가지 방식으로 두 포스터를 비교해 볼 수 있습니다.Select two images or PDFs and choose Compare from the File menu. The modes below match the app's four, computed live on the same two posters.
v1v2


파일을 보내기 전에 확인하고 정리할 수 있는 기능들입니다. 파일 메뉴나 우클릭 메뉴에서 사용할 수 있고, 원본은 그대로 둔 채 확인하거나 사본을 만듭니다.Five tools for right before sending. All live in the File and right-click menus, and they only check or copy — originals stay as they are.

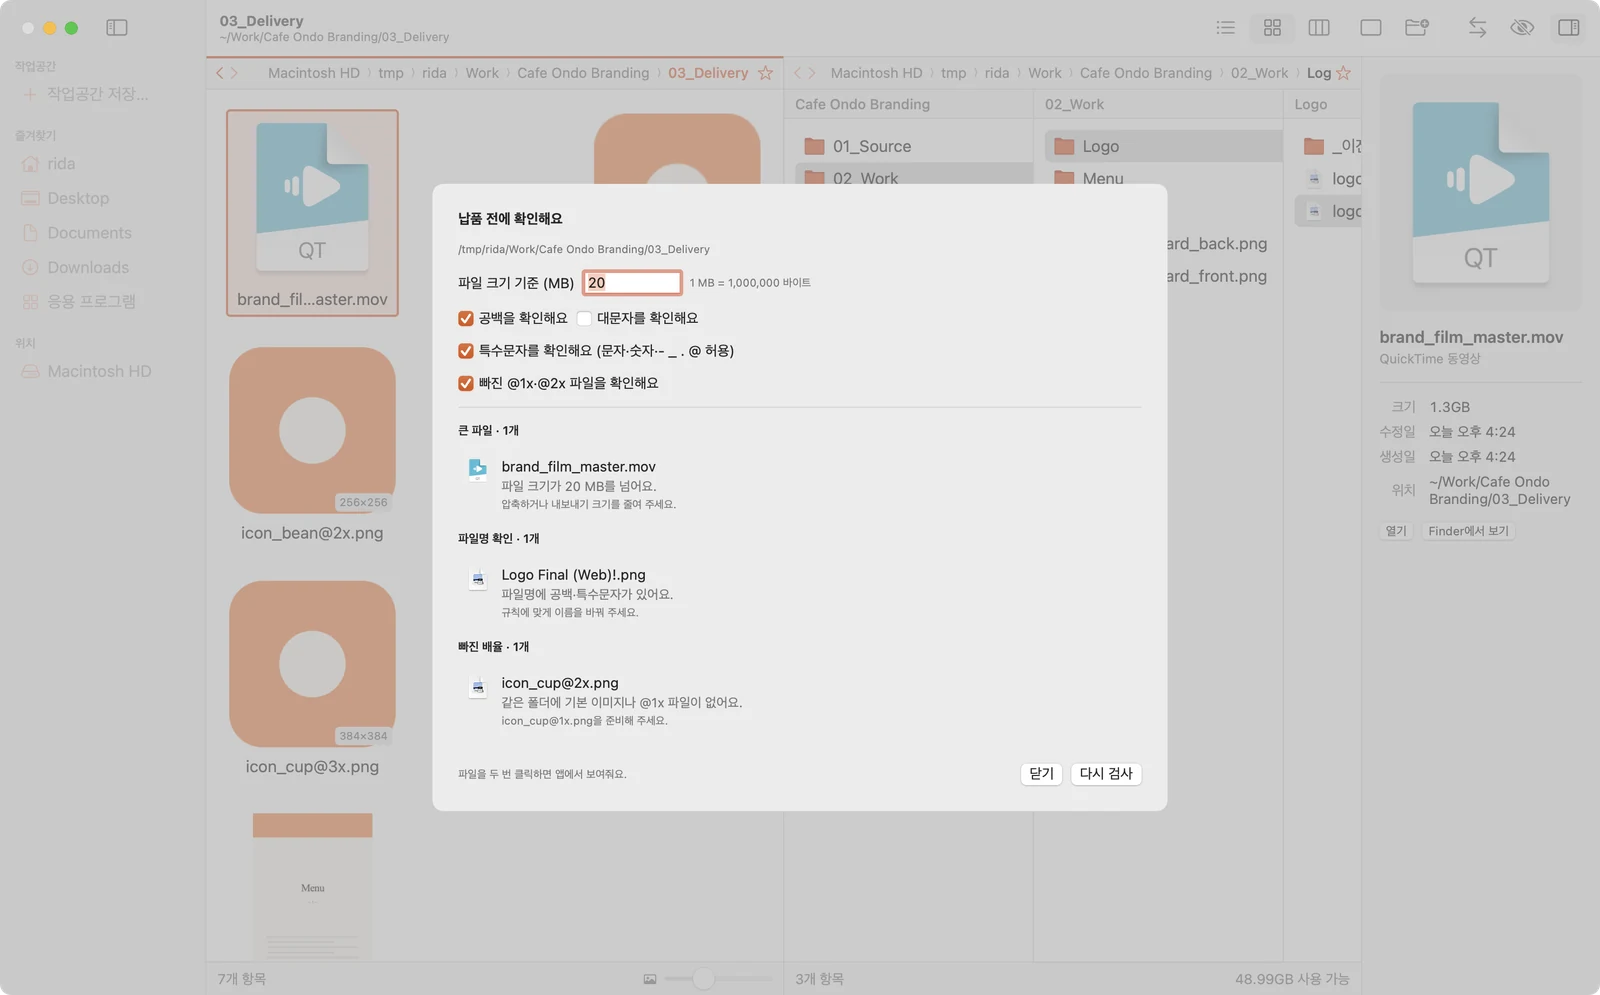
폴더를 검사해 아래 세 가지를 찾아줍니다.Scans a folder for three things.
항목을 두 번 누르면 해당 파일로 바로 이동할 수 있습니다.Double-click an item to jump to it in the app.

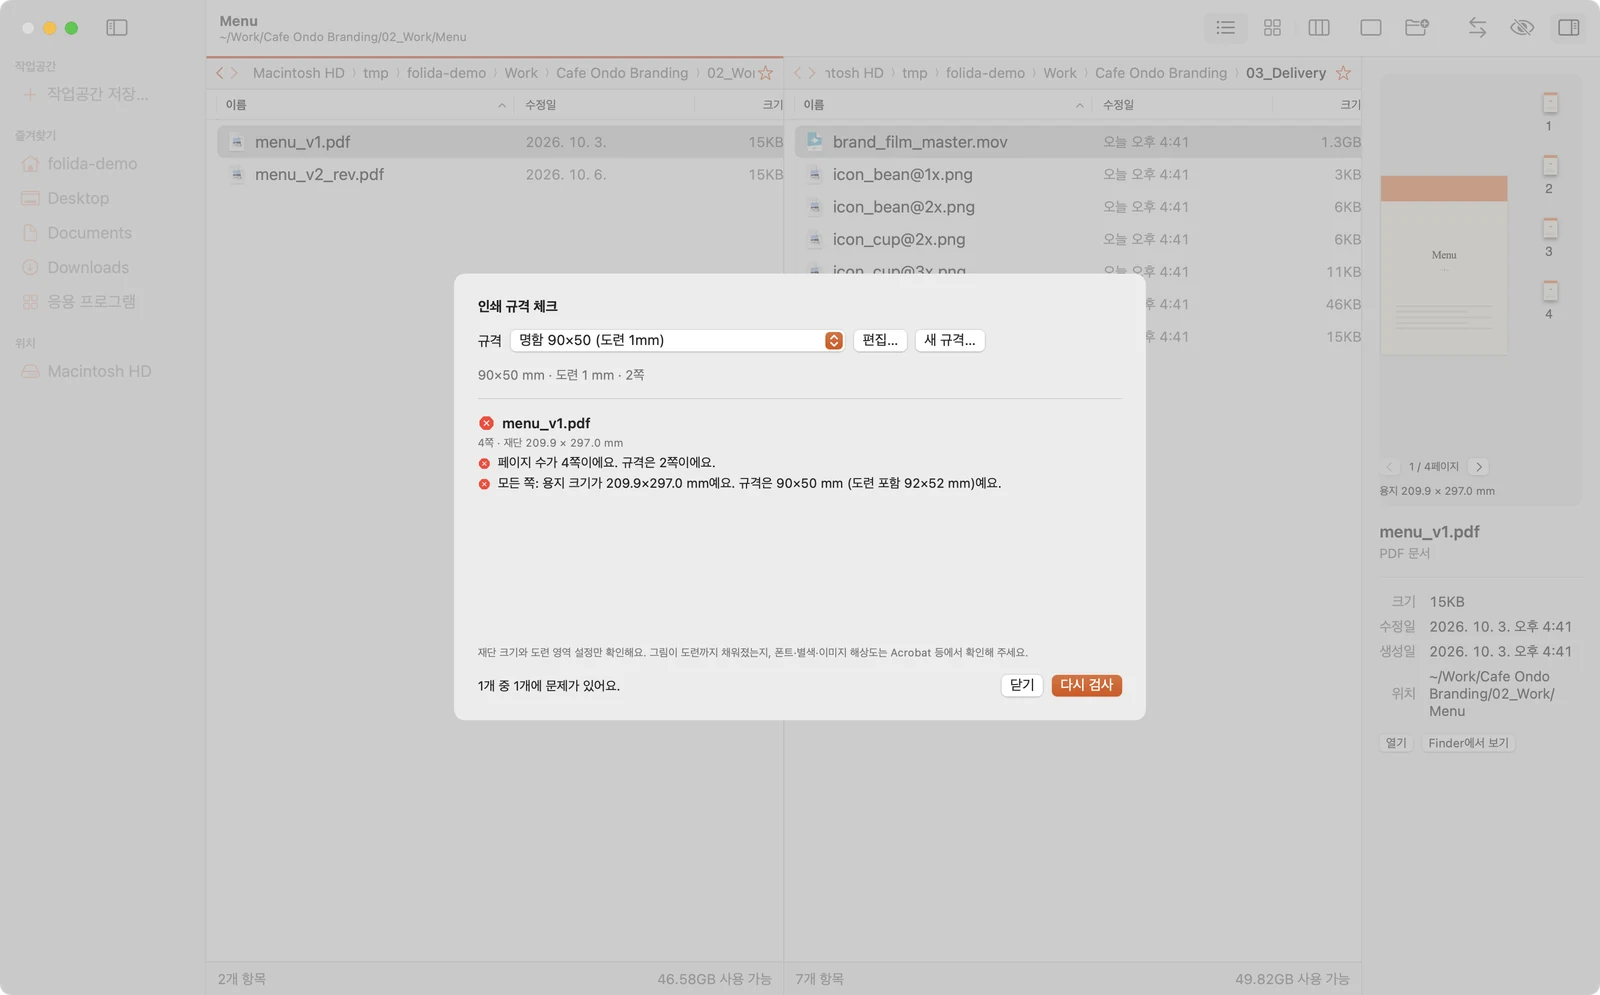
인쇄소마다 다른 재단 크기 · 도련 · 페이지 수를 규격으로 저장해 두고, PDF가 규격에 맞는지 확인할 수 있습니다.Save each print shop's trim size, bleed and page count as a spec and check PDFs against it.

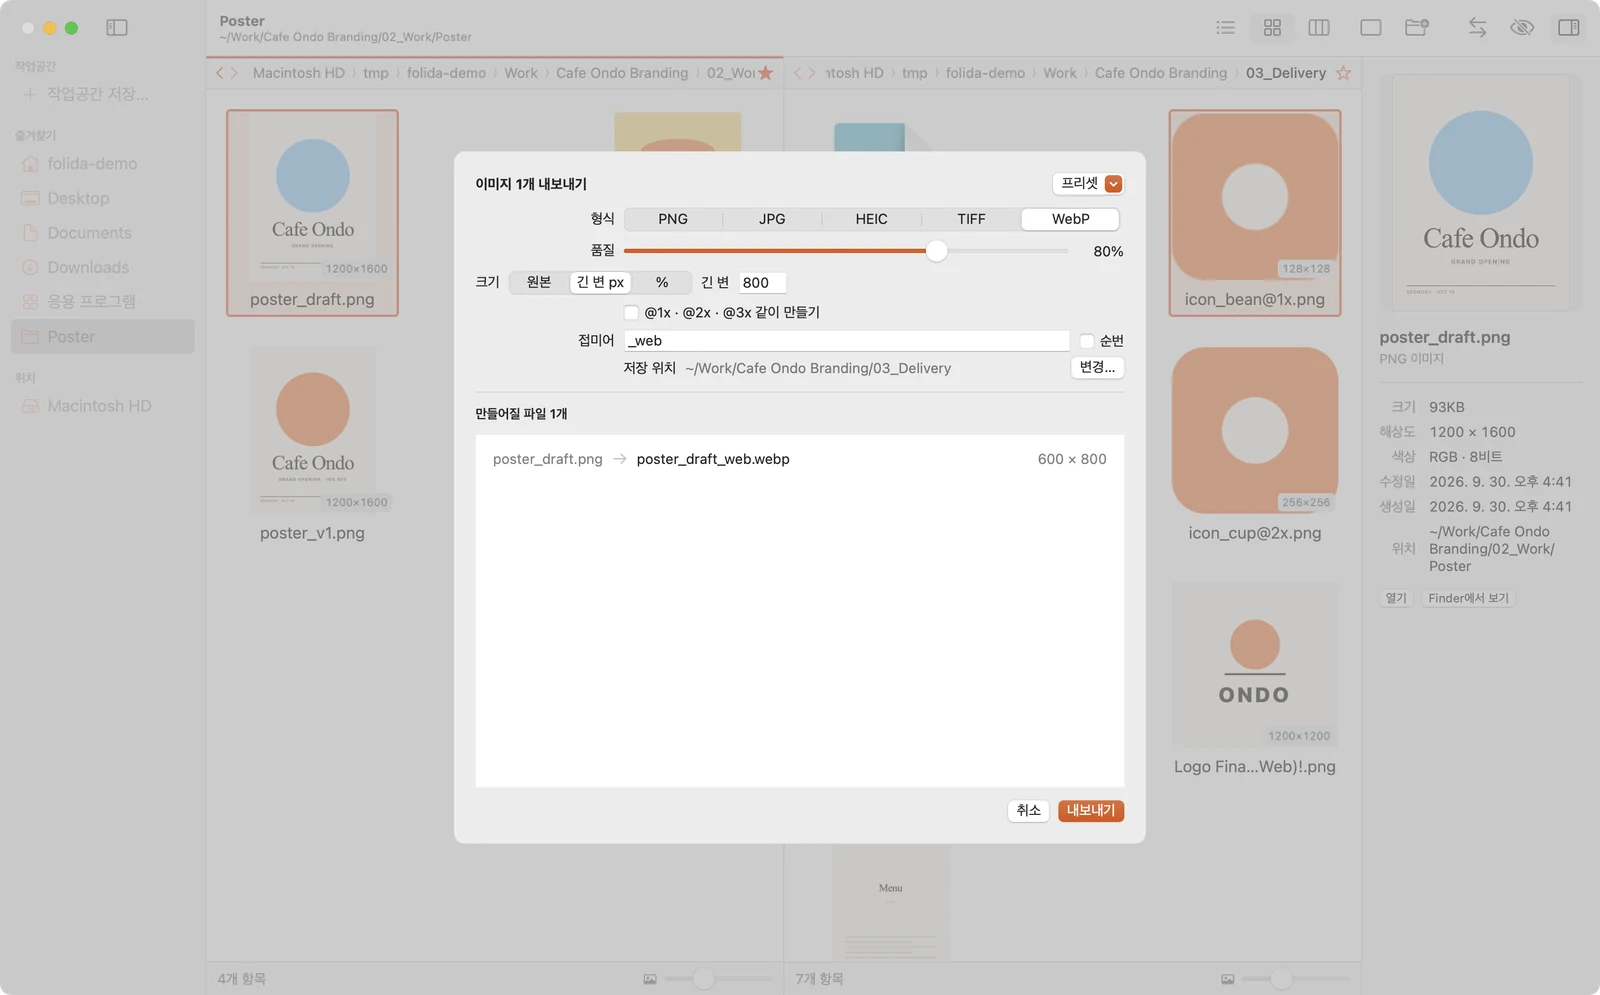
선택한 이미지를 한 번에 다른 형식과 크기로 저장할 수 있습니다.Save selected images in another format and size, all at once.

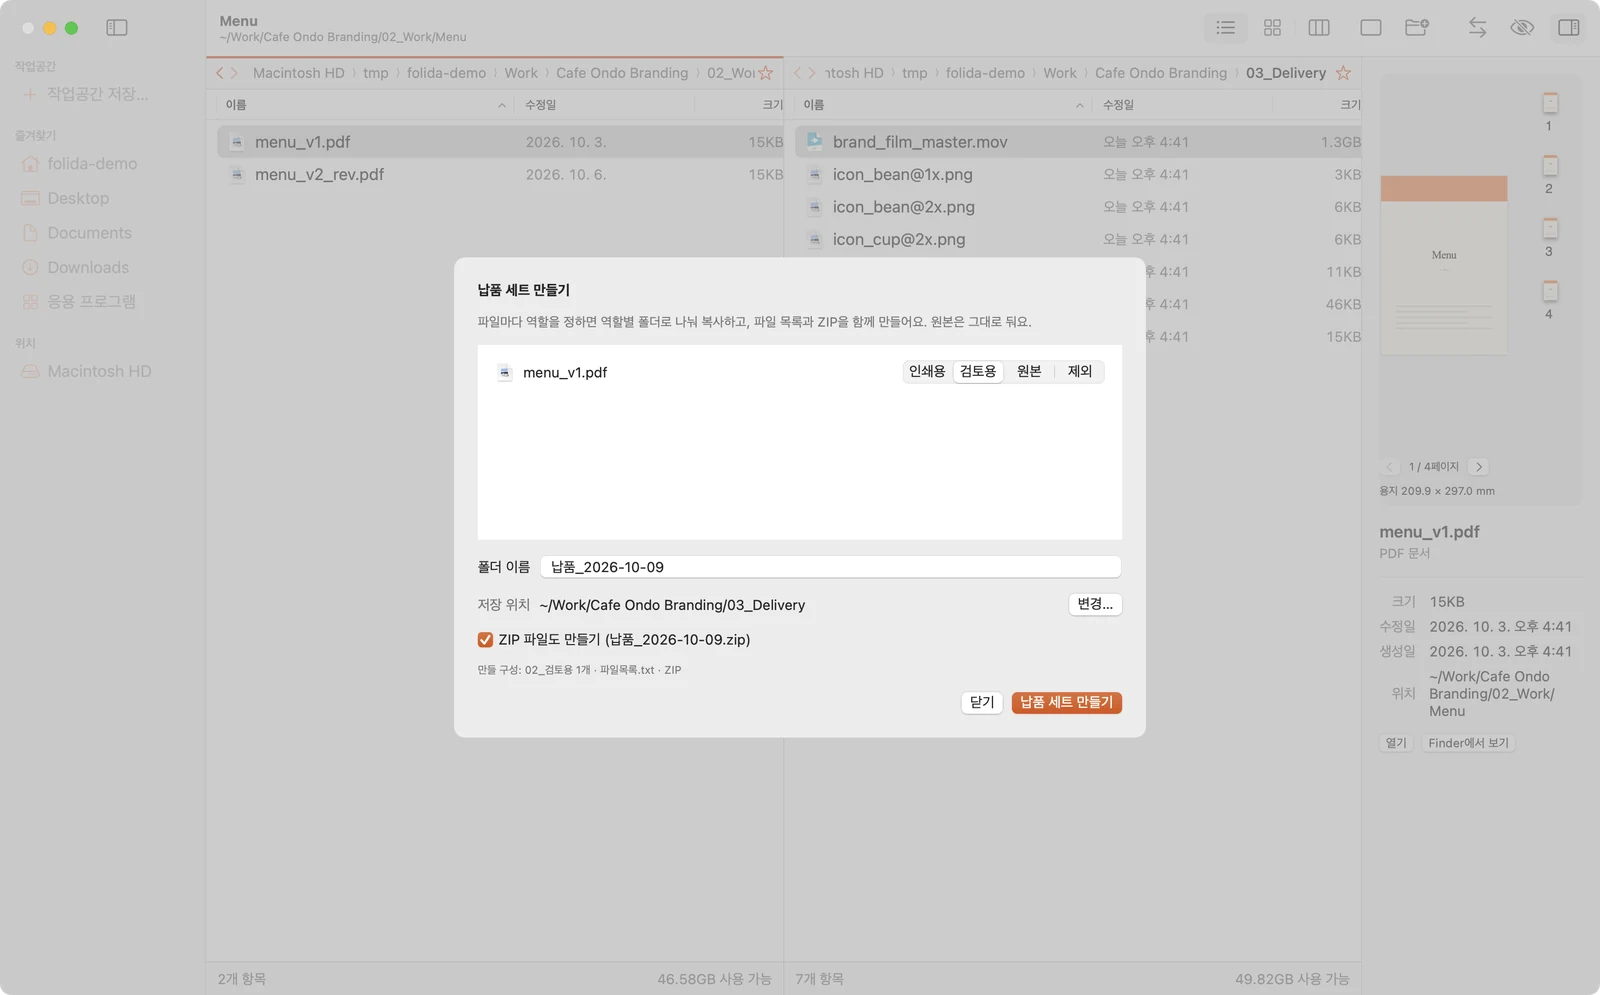
선택한 파일을 검토용 · 인쇄용처럼 역할별로 나눠 새 폴더에 담고, 필요하면 ZIP으로 묶을 수 있습니다. 만들어질 폴더 구성을 먼저 확인할 수 있습니다.Sort selected files into roles such as review and print, put them in a new folder and zip it if needed — with the structure shown first.

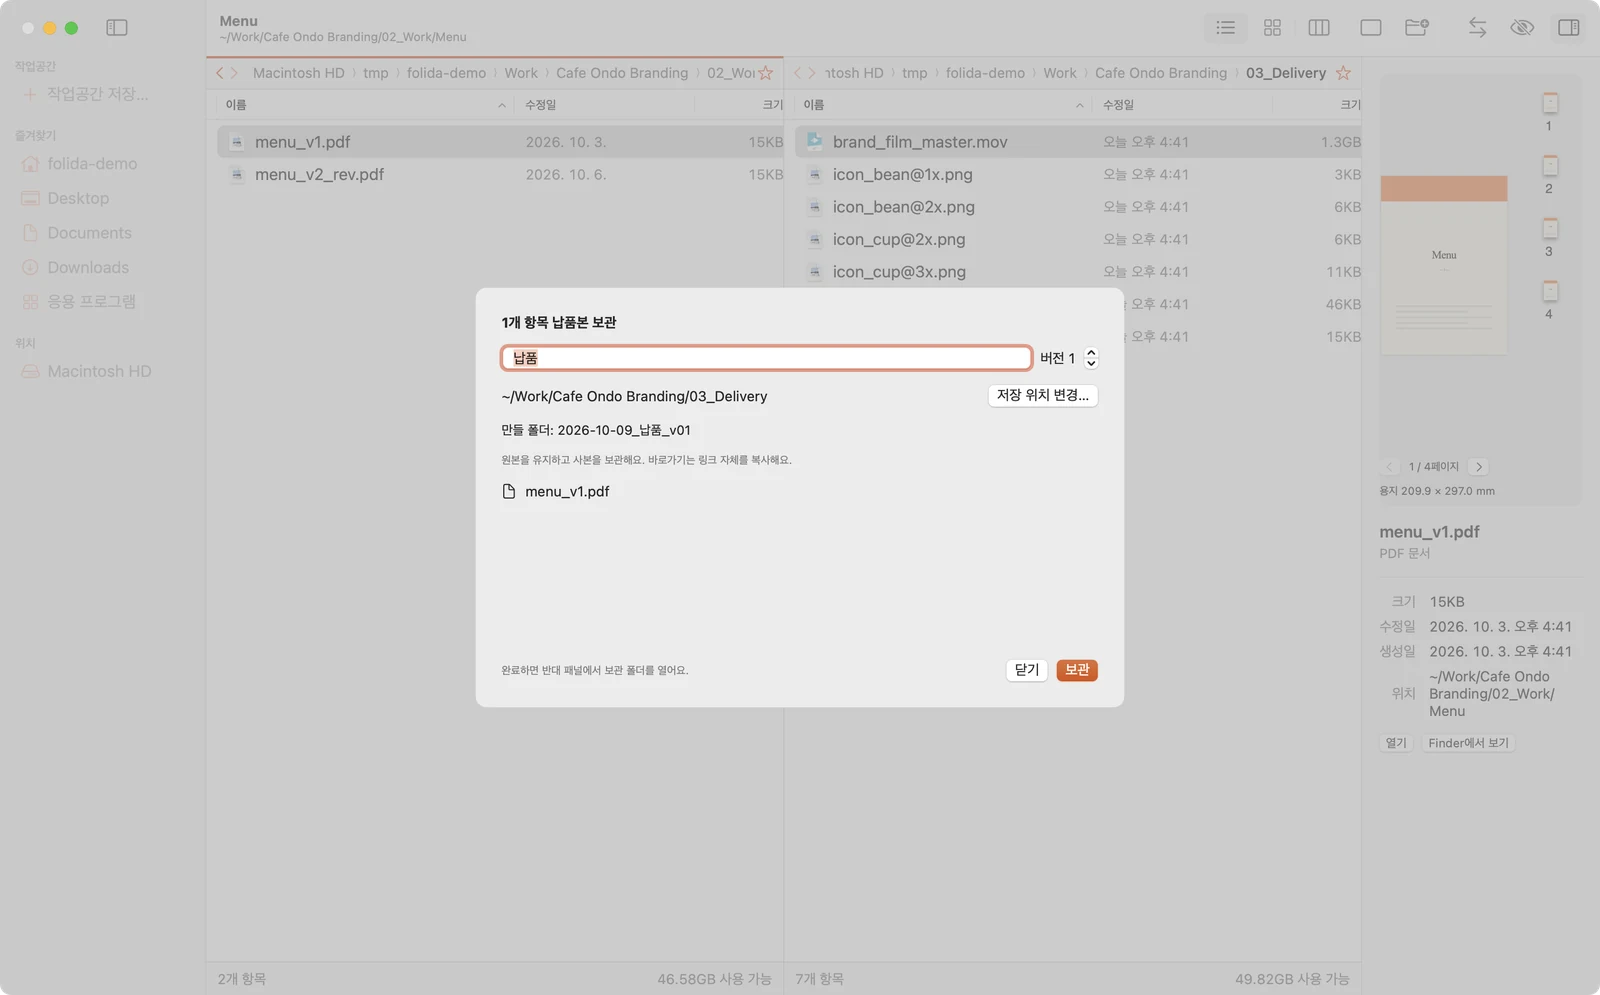
보낸 파일을 그대로 따로 보관해 두어, 나중에 어떤 파일을 보냈는지 바로 찾아볼 수 있습니다.Keeps an exact copy of what was sent, so “what did we send then?” has an answer.
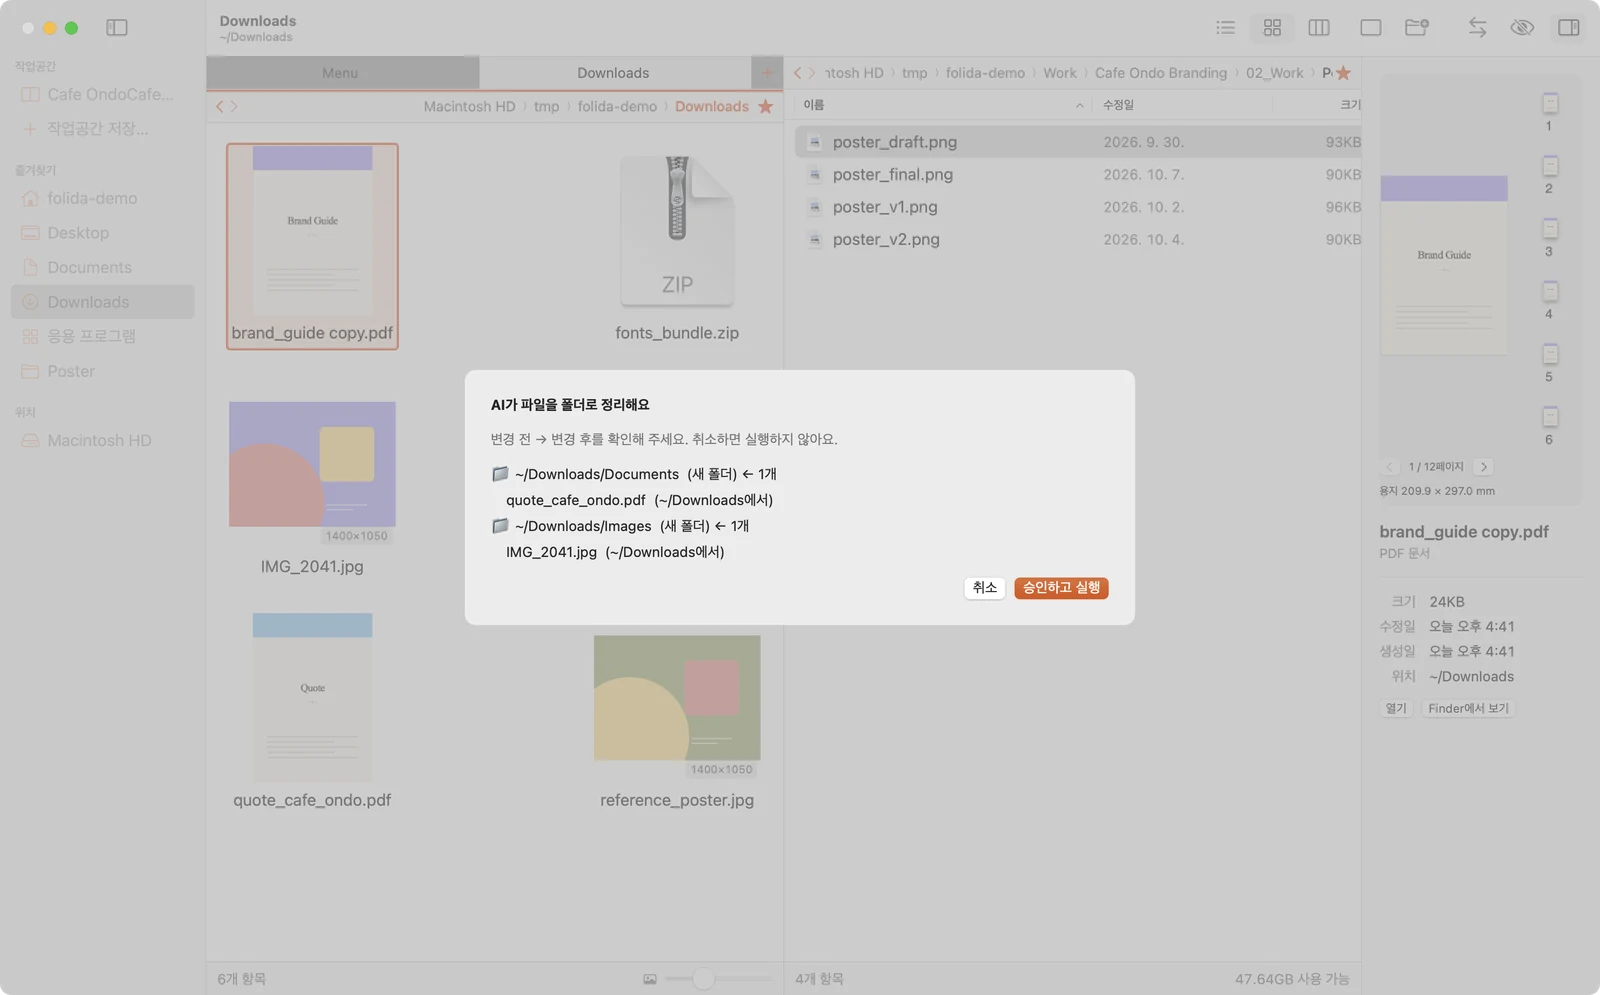
Claude Code나 Codex 같은 AI 앱에 Folida를 연결하면, 말로 부탁한 정리를 AI가 계획하고 Folida가 실행합니다. AI가 파일을 직접 옮기지 않도록 했고, 바뀔 내용을 Folida 창에서 먼저 확인하고 승인해야 실행됩니다.Connect Folida to an AI app such as Claude Code or Codex and it plans the cleanup you ask for while Folida carries it out. The AI never moves files itself: Folida shows the change first and runs it only after you approve.
Folida 설정의 ‘AI 연동’에서 AI가 사용할 폴더를 고르고, 안내된 명령을 터미널에 한 번 입력하면 연결됩니다. Folida 앱 안의 도우미(folida-mcp)를 AI 앱에 등록하는 명령입니다.In Folida's Settings → AI, choose the folders the AI may see, then paste the command shown there into Terminal once. It registers the small helper inside the app (folida-mcp) with your AI app.
# Claude Code claude mcp add --transport stdio folida -- ~/Applications/Folida.app/Contents/Helpers/folida-mcp # Codex codex mcp add folida -- ~/Applications/Folida.app/Contents/Helpers/folida-mcp
연결한 뒤 새로 시작한 AI 대화부터 Folida 도구를 사용할 수 있으며, 정리 기능은 Folida 앱이 켜져 있을 때 동작합니다.The tools appear in AI sessions started after connecting, and cleanup needs Folida running.
AI가 먼저 폴더 내용을 확인한 뒤, 정리 계획을 Folida로 보냅니다. 아래는 예시 대화입니다.The AI reads the folder first, then sends a plan to Folida. An example exchange:
list_folder로 Downloads를 봤어요. 사진 IMG_2041.jpg는 Images로, 견적서 quote_cafe_ondo.pdf는 Documents로 옮기는 계획을 Folida에 보냈어요. Folida 창에서 확인하고 승인해 주세요.I read Downloads with list_folder. I sent Folida a plan: IMG_2041.jpg to Images and quote_cafe_ondo.pdf to Documents. Please check and approve it in Folida.파일을 바꾸는 요청은 모두 Folida의 승인 창에 나타납니다. ‘변경 전 → 변경 후’를 한 줄씩 확인한 뒤 승인해야 실행되고, 원하지 않으면 취소할 수 있습니다.Every change arrives as an approval sheet in Folida, listing before → after line by line. Nothing happens until you approve; cancel if it's wrong.

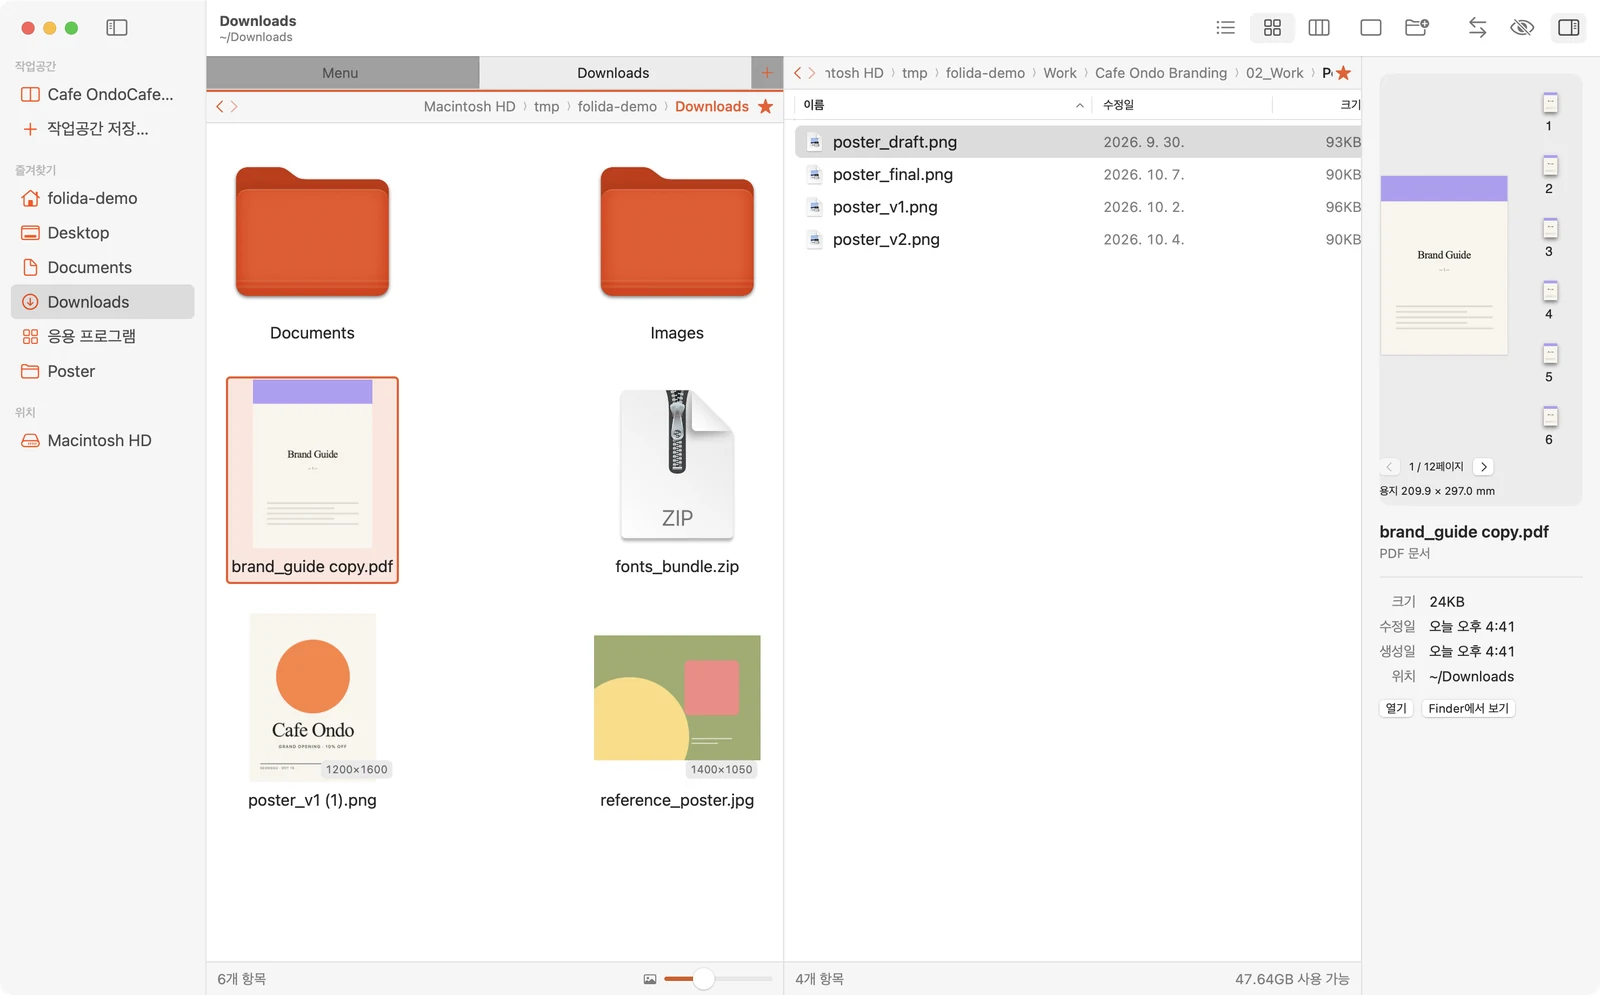
승인하면 Downloads 안에 Images와 Documents 폴더가 만들어지고 두 파일이 옮겨집니다. 필요한 폴더는 새로 만들고, 지워지는 파일은 없습니다.After approval, Images and Documents appear inside Downloads with the two files. Missing folders are created; nothing is deleted.

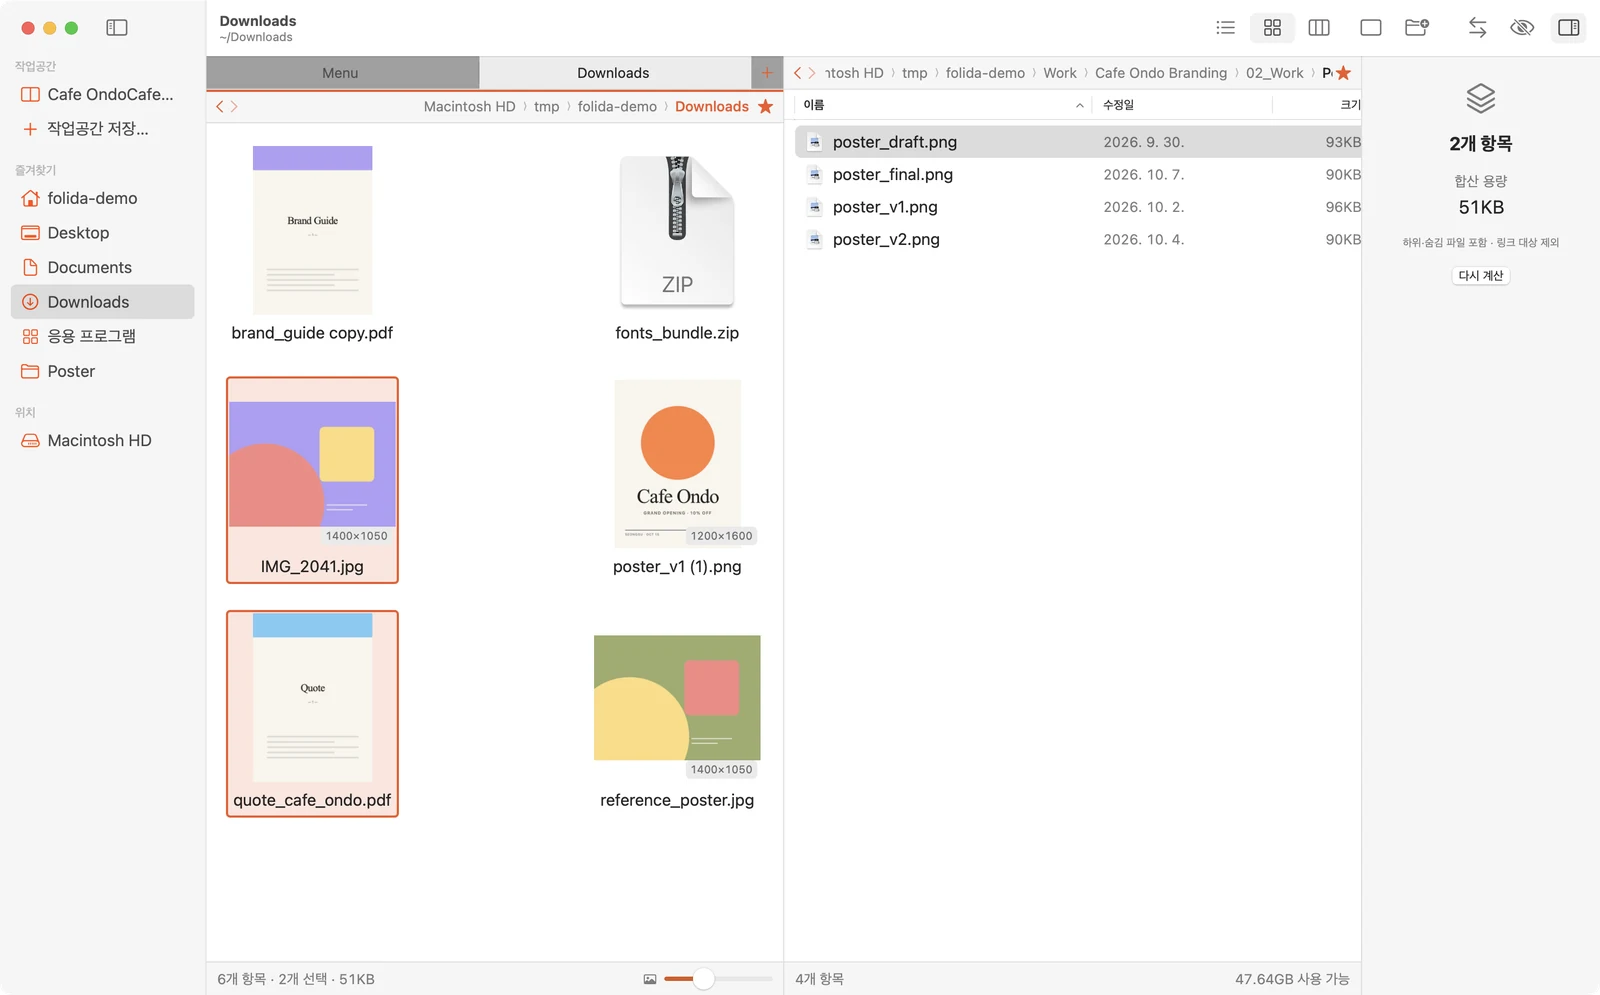
결과가 마음에 들지 않으면 파일 목록에서 ⌘Z로 마지막 AI 정리를 취소할 수 있고, 두 파일은 원래 자리로 돌아갑니다.Not happy? Press ⌘Z in the file list. The last AI cleanup is reversed and both files return to Downloads.

| 도구Tool | 하는 일What it does | 승인Approval |
|---|---|---|
| current_panes | 지금 좌우 패널의 폴더와 선택한 항목Folders and selection in both panes | 읽기Read |
| list_folder | 폴더 안 목록 (최대 1,000개)List a folder (up to 1,000 items) | 읽기Read |
| find_name | 하위 폴더까지 이름으로 찾기Find by name in subfolders | 읽기Read |
| folder_size | 폴더 전체 용량Total folder size | 읽기Read |
| workspaces | 저장한 작업공간 목록Saved workspaces | 읽기Read |
| find_versions | 꼬리말만 다른 버전 묶음 찾기Find version groups | 읽기Read |
| navigate | 왼쪽 · 오른쪽 패널을 다른 폴더로 이동Point a pane at another folder | 승인 필요Approval |
| batch_rename | 일괄 이름변경 (확장자 유지)Batch rename, extensions kept | 승인 필요Approval |
| organize_files | 파일을 폴더로 옮겨 정리, 없는 폴더는 만듦Move files into folders, creating them if needed | 승인 필요Approval |
| version_cleanup | 최신만 남기고 나머지를 _이전버전으로Keep the newest, move the rest to _이전버전 | 승인 필요Approval |
| delivery_archive | 새 폴더에 납품본 사본 보관Archive a delivery copy | 승인 필요Approval |
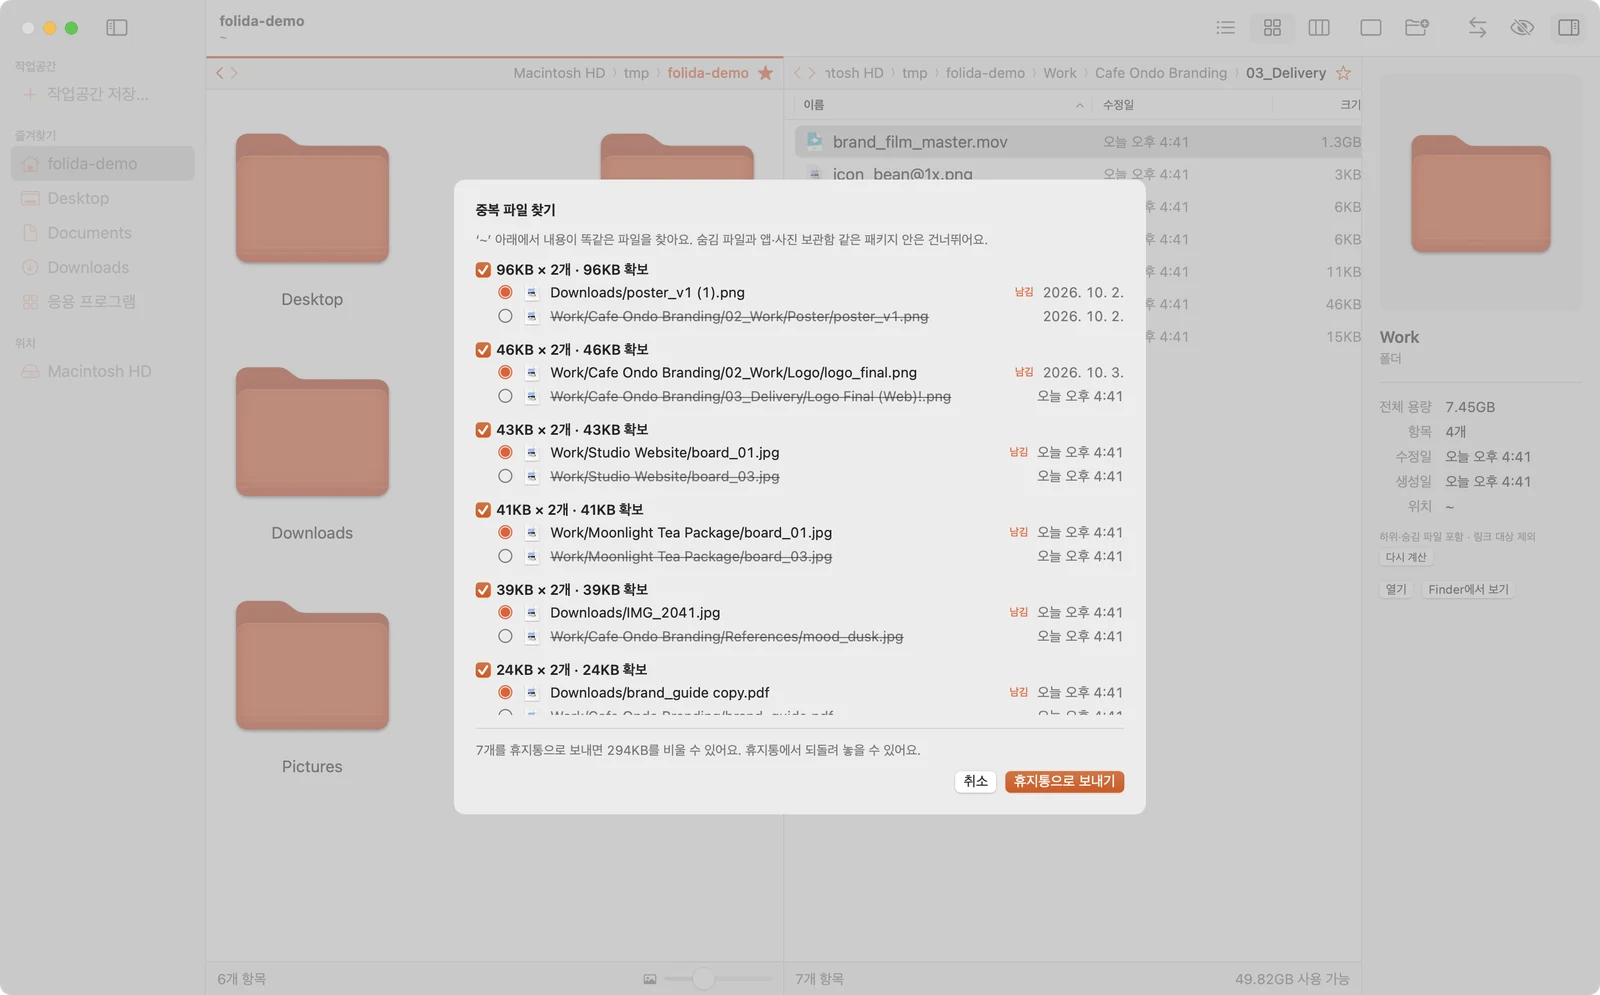
쌓인 사본을 찾고, 두 폴더의 차이를 확인하고, 압축 파일을 다룰 수 있습니다.Find stray copies, check two folders match, and handle ZIPs.

이름이 달라도 내용이 완전히 같은 파일을 찾아줍니다. ‘poster_v1 (1).png’, ‘brand_guide copy.pdf’ 같은 다운로드 사본을 정리할 때 쓸 수 있습니다.Finds files with identical content even under different names — download copies like “poster_v1 (1).png”.

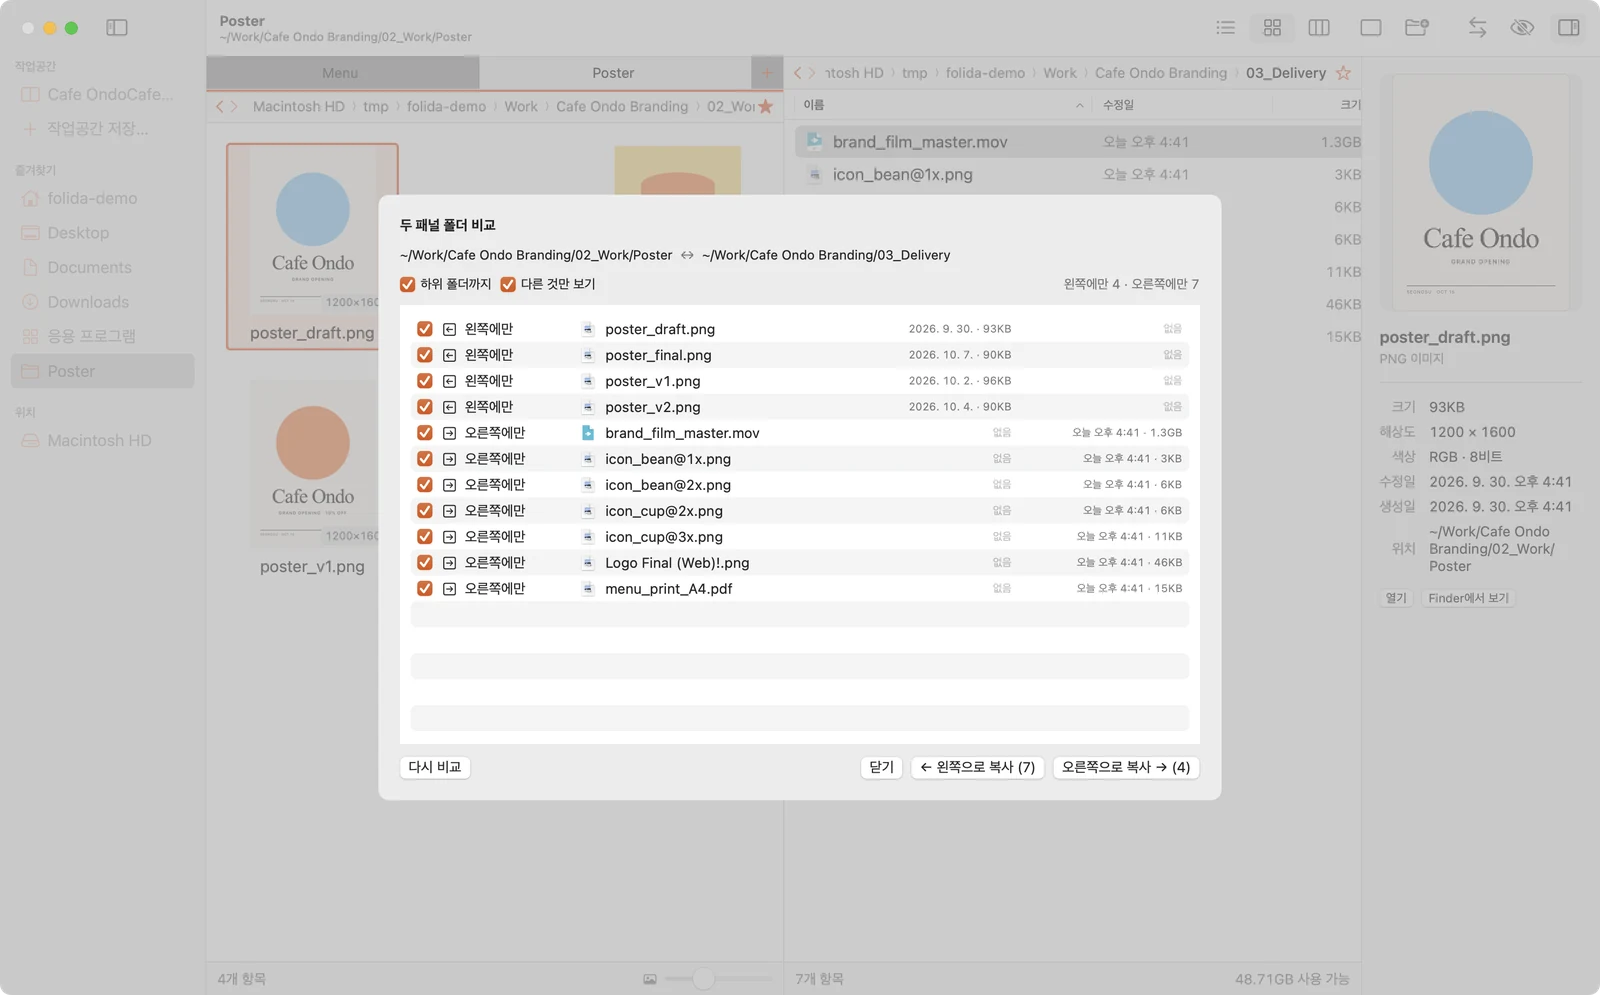
왼쪽 원본 폴더와 오른쪽 납품 폴더를 이름 기준으로 비교할 수 있습니다.Matches the left (source) and right (delivery) folders by name.

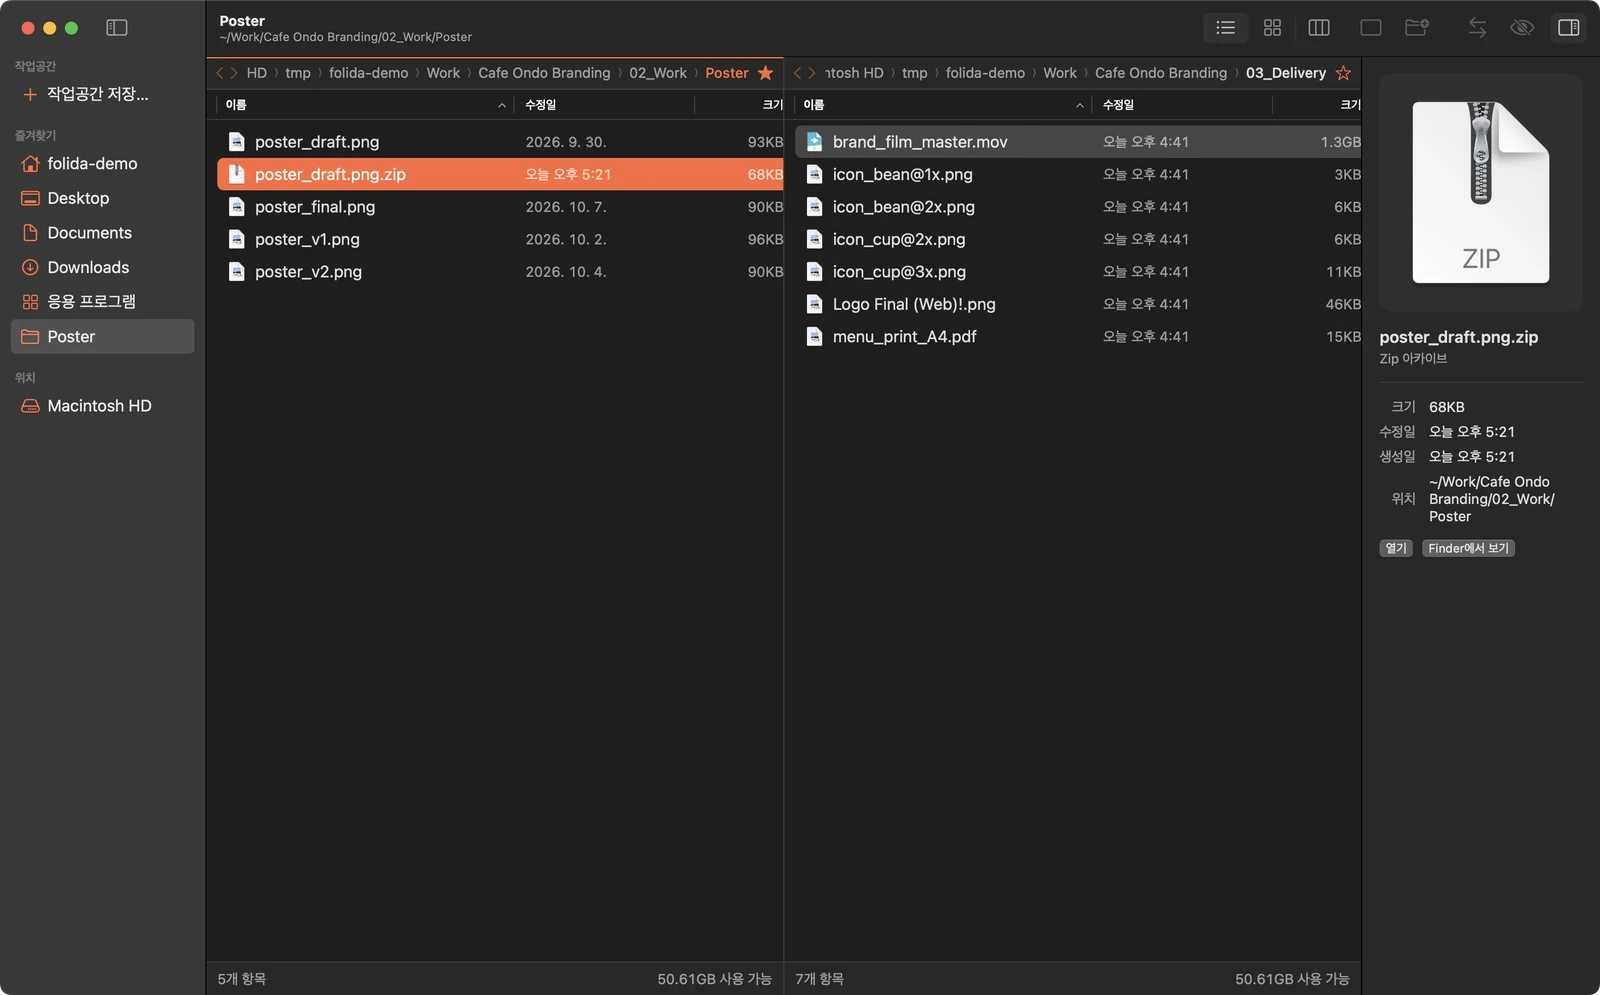
우클릭 메뉴의 ‘압축하기’로 바로 ZIP을 만들 수 있고, 여러 개를 고르면 ‘보관.zip’ 하나로 묶입니다. ‘.zip 풀기’는 같은 폴더의 새 폴더에 풀어주며 원본 ZIP은 그대로 남습니다.Right-click → Compress makes a ZIP; several items become one archive. Unzip extracts into a new folder beside it and keeps the ZIP.
이름이 겹치면 ‘이름 2’로 만들어지고, 실패하면 만들던 파일은 휴지통으로 이동합니다.Clashing names get a “2”; a failed run sends the partial file to the Trash.

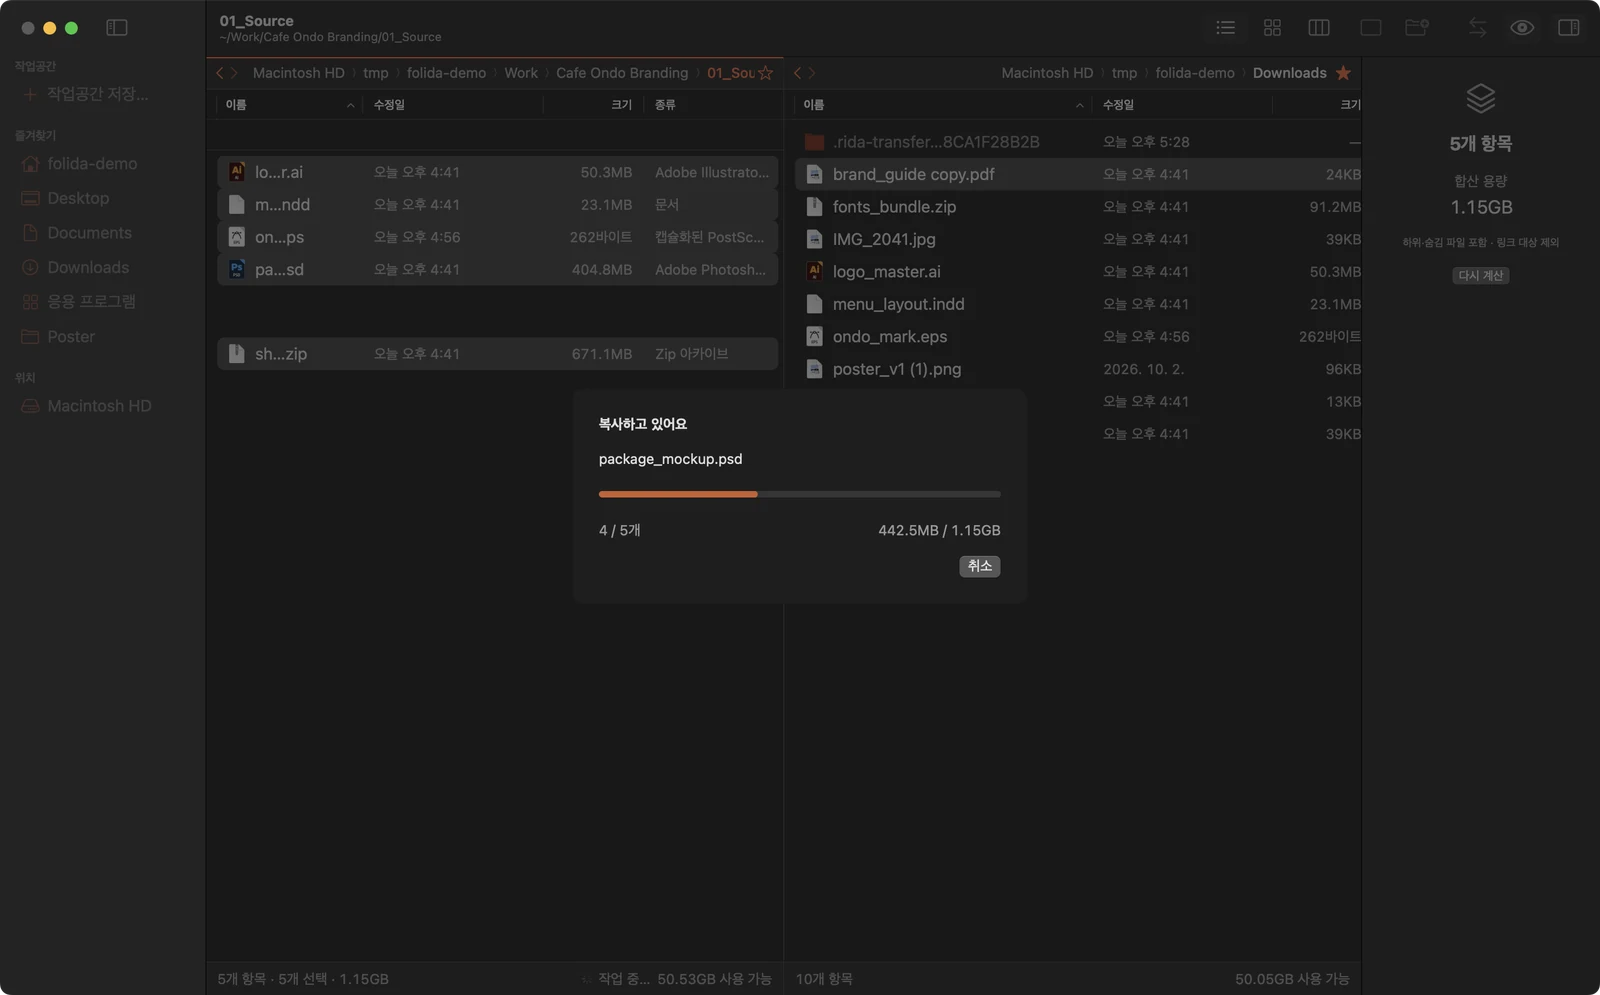
0.5초 넘게 걸리는 복사 · 이동은 진행률 창에서 현재 파일 · 개수 · 용량을 확인하고 취소할 수 있습니다.Copies and moves longer than half a second show a progress sheet with current file, count, size and cancel.
취소하거나 실패하면 만들던 사본만 휴지통으로 이동하고, 다른 디스크로 옮길 때는 복사가 모두 끝난 뒤에 원본을 지우도록 했습니다.Cancel or failure trashes only the partial copy. Moving across disks deletes originals only after copying finishes.
프로젝트를 시작하고, 하던 작업을 이어가고, 다른 앱과 오갈 때 쓸 수 있는 기능입니다.For starting projects, picking up where you left off and moving between apps.

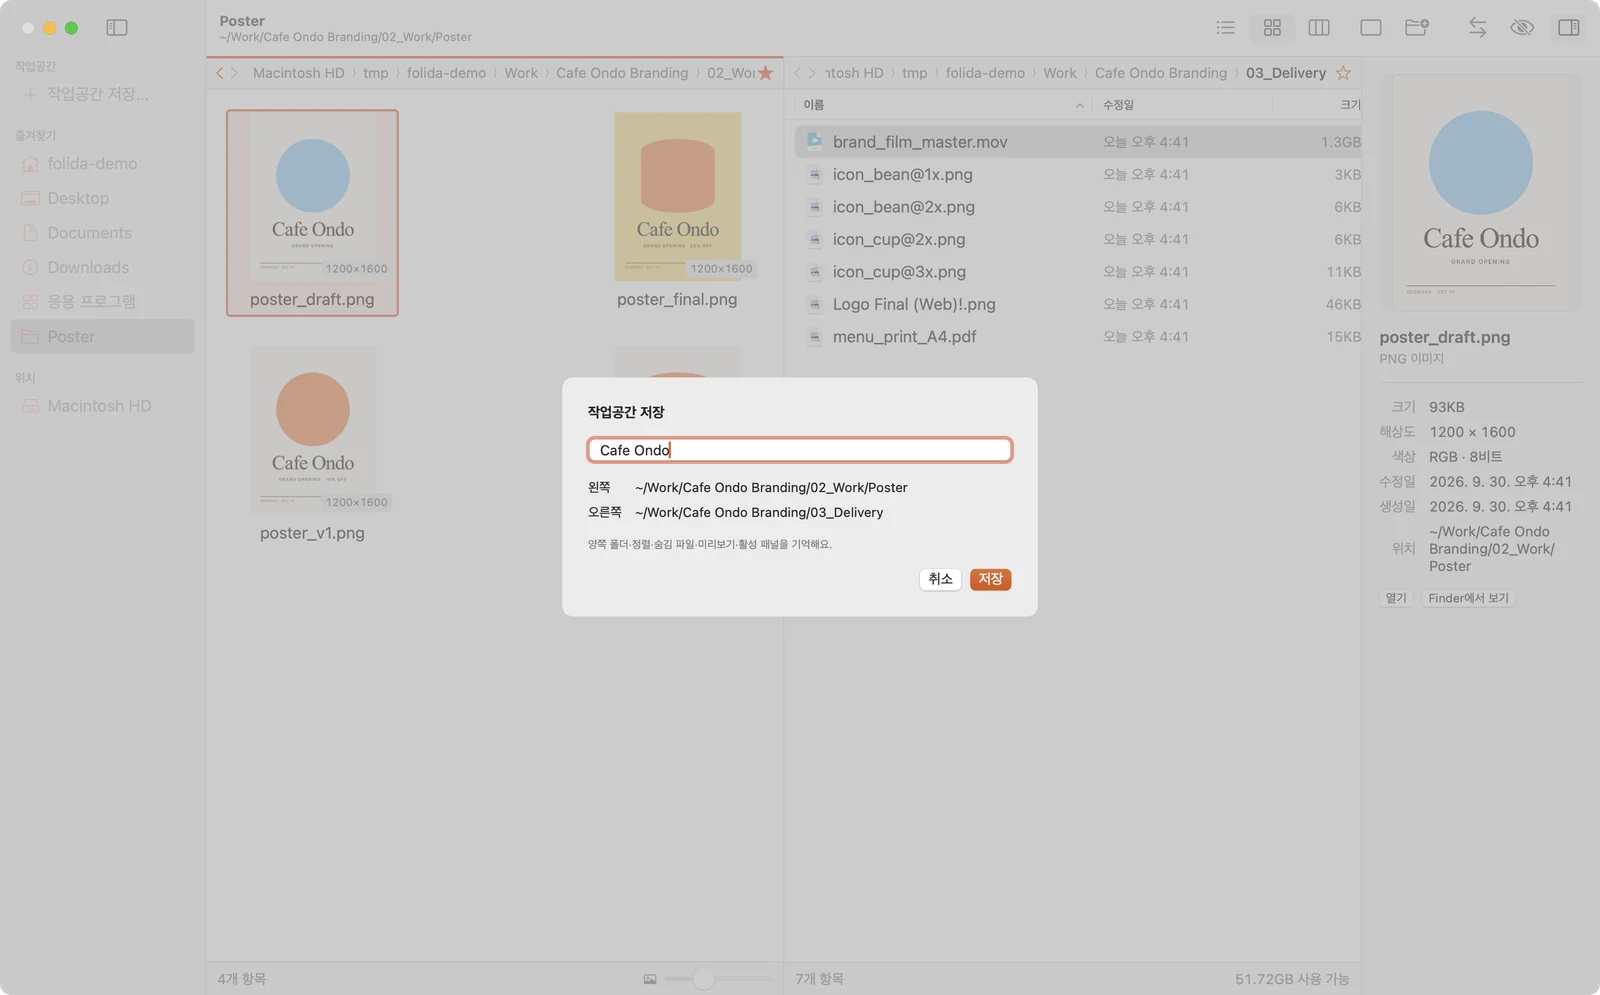
사이드바의 ‘작업공간 저장…’에 프로젝트 이름을 붙이면 좌우 폴더, 정렬, 보기 방식, 썸네일 · 글자 크기, 미리보기 상태까지 그대로 저장할 수 있습니다.Name the current state under “Save Workspace…” and it remembers everything: both folders, sorting, hidden files, view modes, sizes, inspector and active pane.

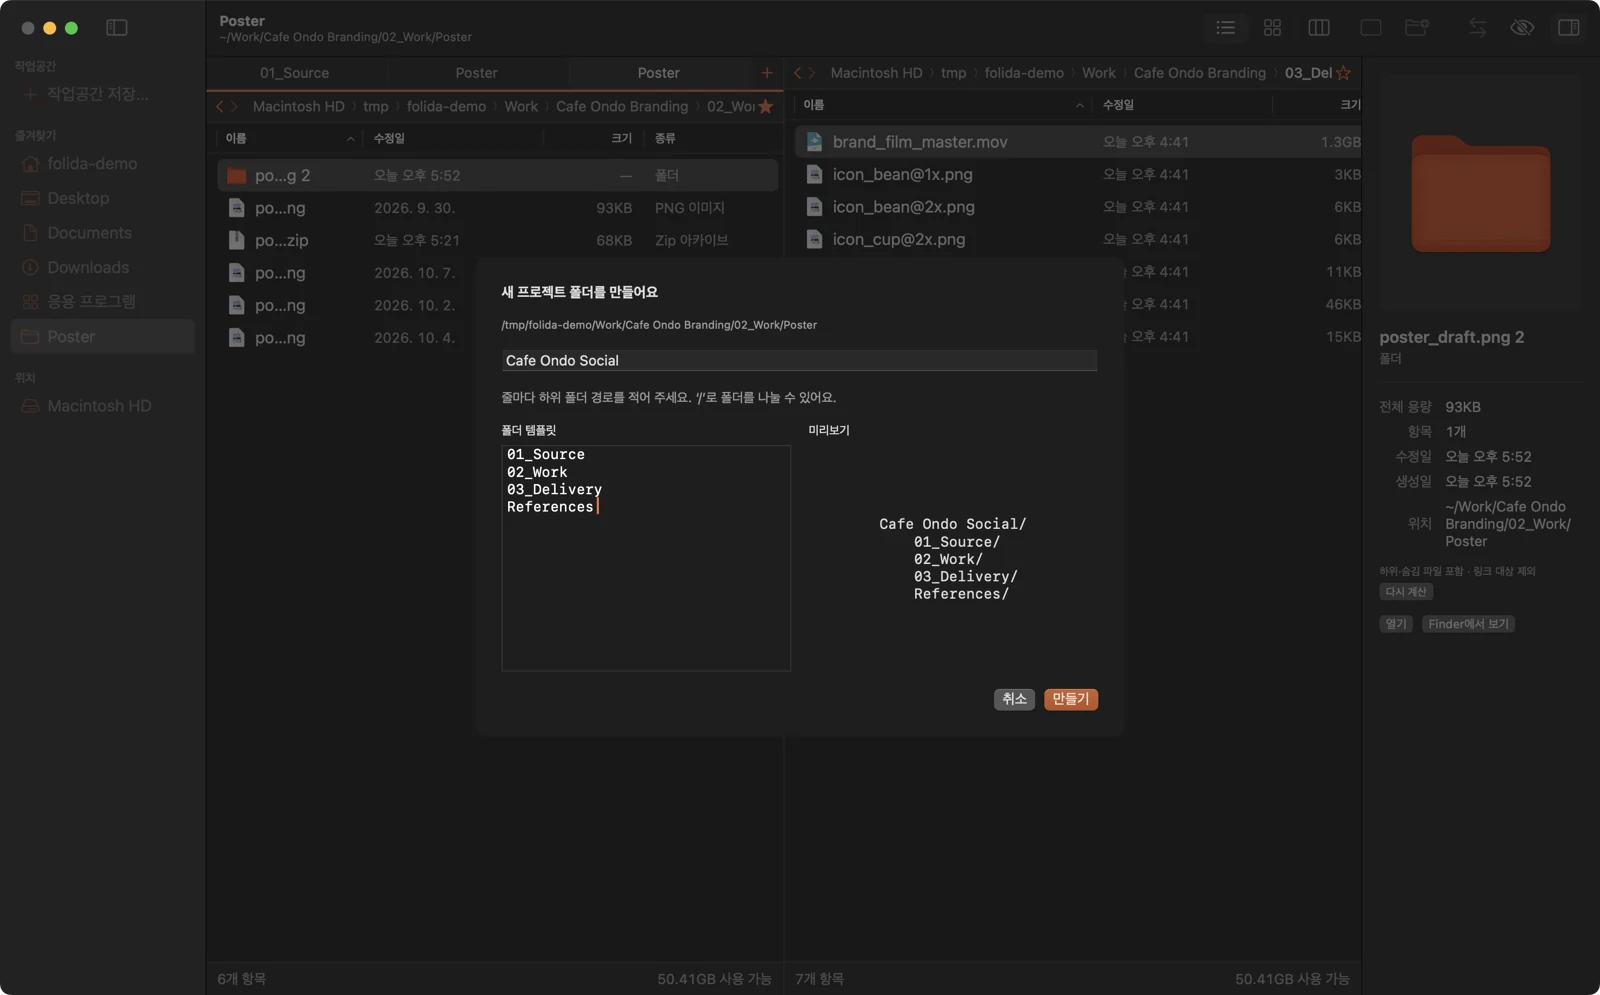
프로젝트 이름만 입력하면 01_Source / 02_Work / 03_Delivery / References 같은 폴더 구조를 한 번에 만들 수 있습니다. 템플릿은 설정에서 원하는 구조로 바꿀 수 있습니다.Type a name and a structure such as 01_Source / 02_Work / 03_Delivery / References appears at once. Edit the template in Settings, one path per line.

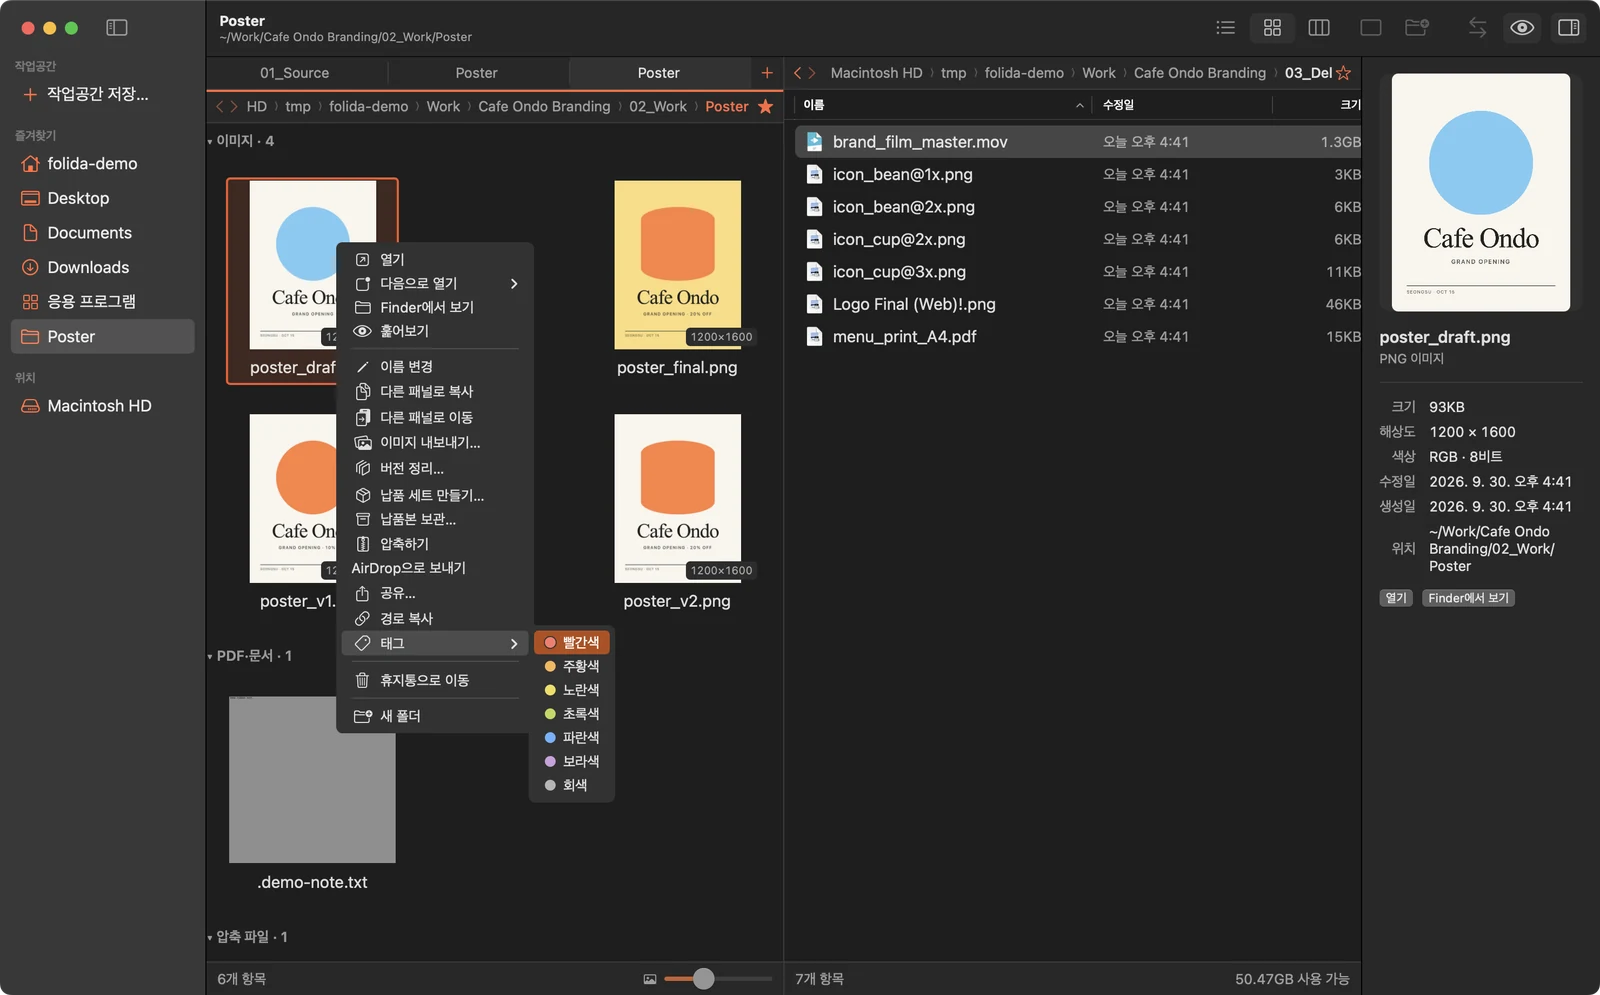
우클릭 메뉴의 ‘태그’에서 Finder와 같은 7가지 색 태그를 붙이거나 뗄 수 있습니다. 태그는 목록과 그리드에 색 점으로 표시되고, Finder에서 붙인 태그도 함께 보입니다.Add or remove the seven Finder colours from the right-click menu. Other tags stay; colours show as dots, including ones set in Finder.

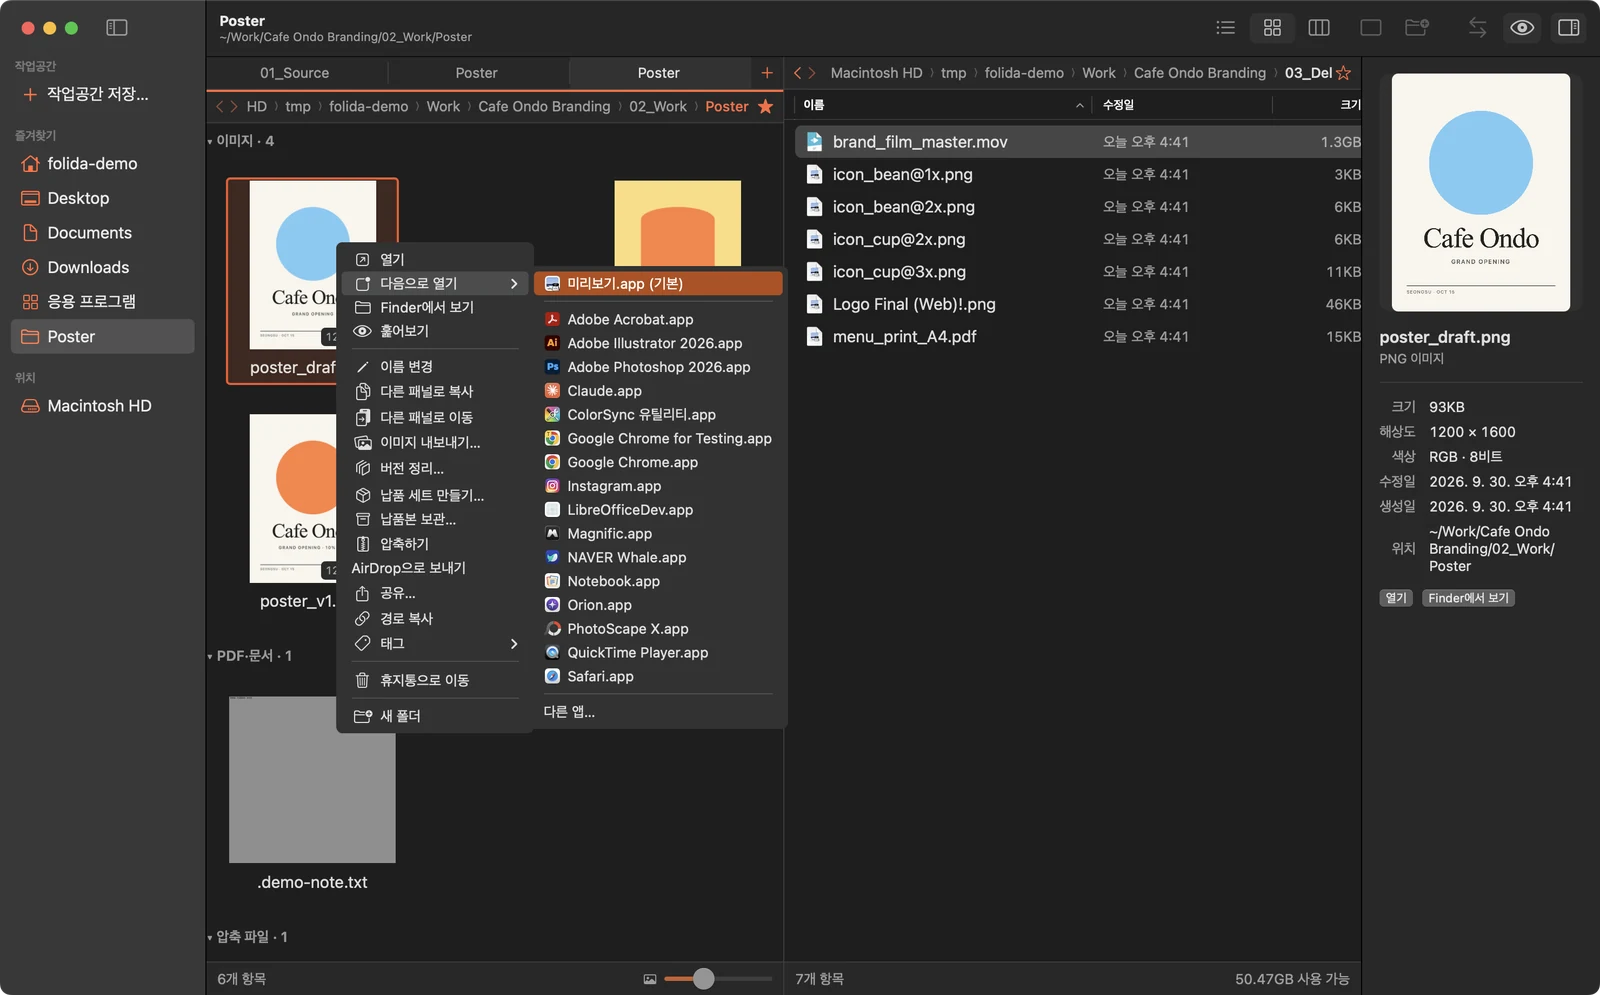
선택한 파일을 열 수 있는 앱을 기본 앱부터 보여주고, 목록에 없는 앱은 ‘다른 앱…’에서 직접 고를 수 있습니다.Lists apps that can open every selected file, default first; “Other…” picks any app.

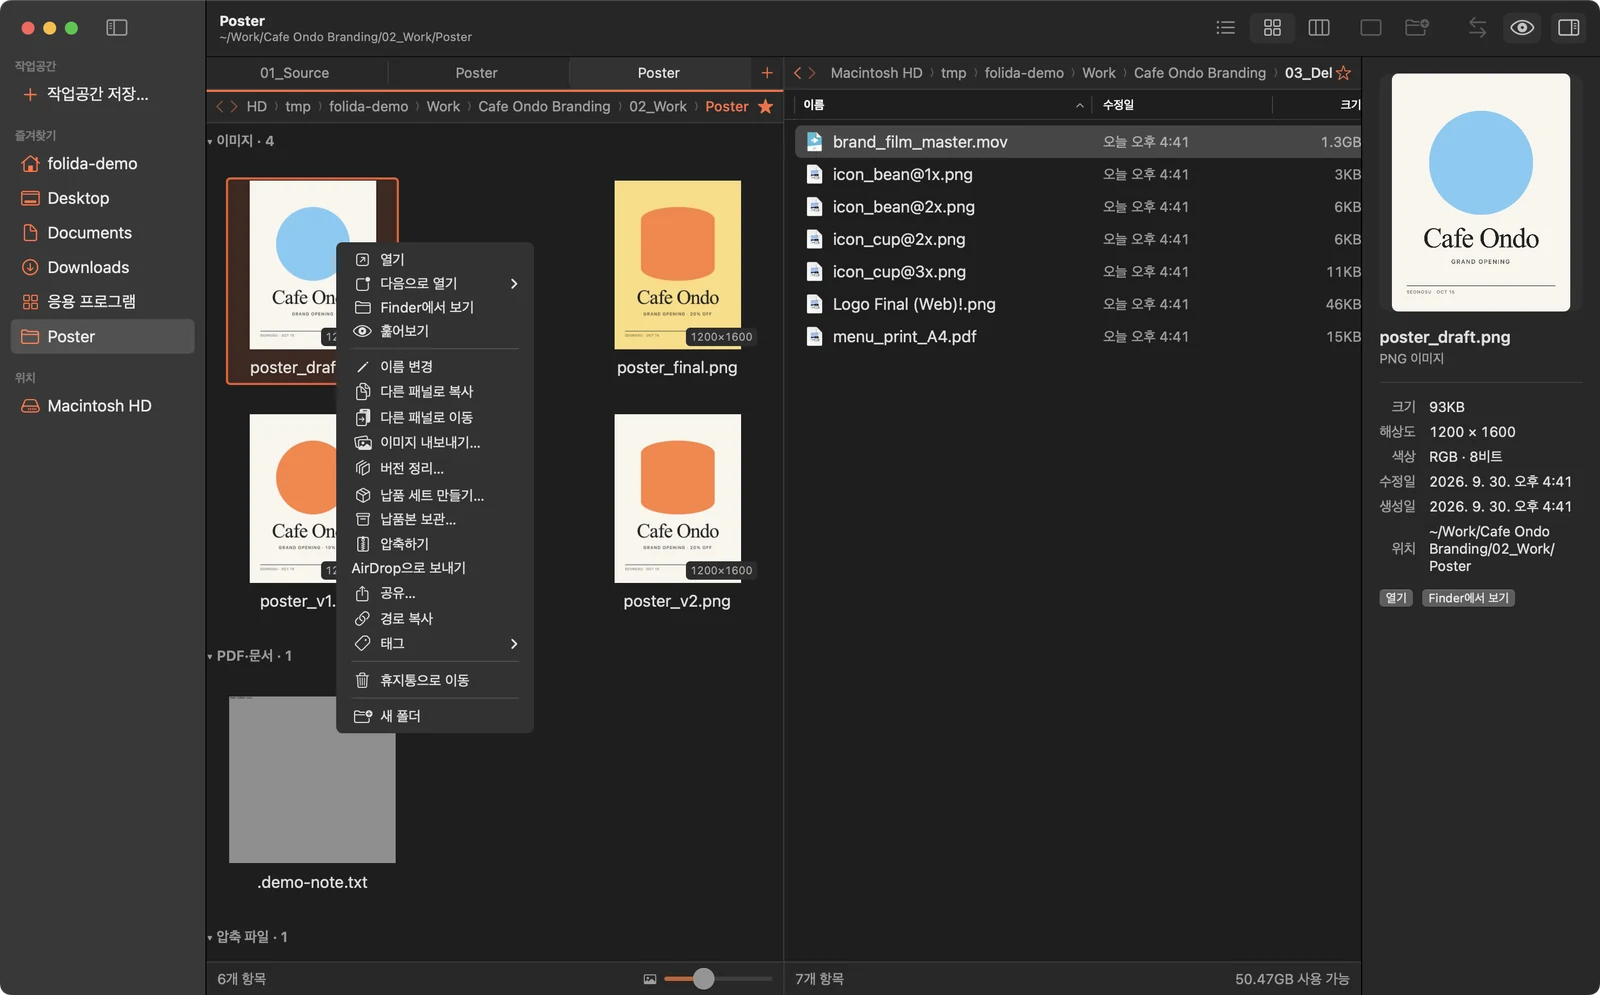
대부분의 기능을 우클릭 메뉴에서 바로 사용할 수 있습니다. 경로 복사, 새 탭에서 열기, AirDrop 보내기, Finder에서 보기도 함께 들어 있습니다.Most of the features above are one right-click away, along with Copy Path, Open in New Tab, AirDrop and Show in Finder.
자주 쓰는 기능은 키보드로도 사용할 수 있습니다. F5 · F6 같은 기능키는 기존 듀얼 패널 파일관리자에 익숙한 배치를 따랐습니다.For when your hands are on the keyboard. Function keys like F5 and F6 follow the familiar commander-style layout.
화면은 macOS 시스템 색과 글꼴을 따르고, 포인트 색은 레드오렌지 하나로 정했습니다. 폴더 아이콘에도 같은 색을 써서 파일 사이에서 폴더가 잘 보이도록 했습니다.The interface uses macOS system colours and type, with one red-orange point. Folder icons take that colour too, so folders stand out among files.